web-dev-workshop
Part I: HTML & CSS - Designing Layouts, Content & Styles
Before the Workshop
- Download and install Google Chrome on your computer: https://www.google.com/chrome/
- Download and install Atom on your computer: https://atom.io
- Sign up for GitHub: https://github.com
Terminologies
Internet
The Internet is the global system of interconnected computer networks that uses the Internet protocol suite (TCP/IP) to link devices worldwide. (Wikipedia)
World Wide Web
The World Wide Web (WWW), commonly known as the Web, is an information system where documents and other web resources are identified by Uniform Resource Locators (URLs, such as https://www.example.com/), which may be interlinked by hypertext, and are accessible over the Internet. (Wikipedia)
Web browser
A web browser (commonly referred to as a browser) is a software application for accessing information on the World Wide Web. (Wikipedia)
Web development
Web development is the work involved in developing a website for the Internet (World Wide Web) or an intranet (a private network). (Wikipedia)
HTML
Hypertext Markup Language (HTML) is the standard markup language for documents designed to be displayed in a web browser. (Wikipedia)
CSS
Cascading Style Sheets (CSS) is a style sheet language used for describing the presentation of a document written in a markup language like HTML. (Wikipedia)
Overview
HTML
HTML describes the structure and content of a web page.
<!DOCTYPE html>
<html>
  <head>
    <title>Title of the page</title>
  </head>
  <body>
    <h1>This is a Heading</h1>
    <p>This is a paragraph.</p>
  </body>
</html>
- HTML introduction: https://www.w3schools.com/html/html_intro.asp
- HTML tutorial: https://www.w3schools.com/html/default.asp
HTML elements
An HTML element usually consists of an opening tag and a closing tag, with content in between.
<tagname>some content</tagname>
- HTML elements: https://www.w3schools.com/html/html_elements.asp
- HTML element reference: https://www.w3schools.com/TAGS/default.ASP
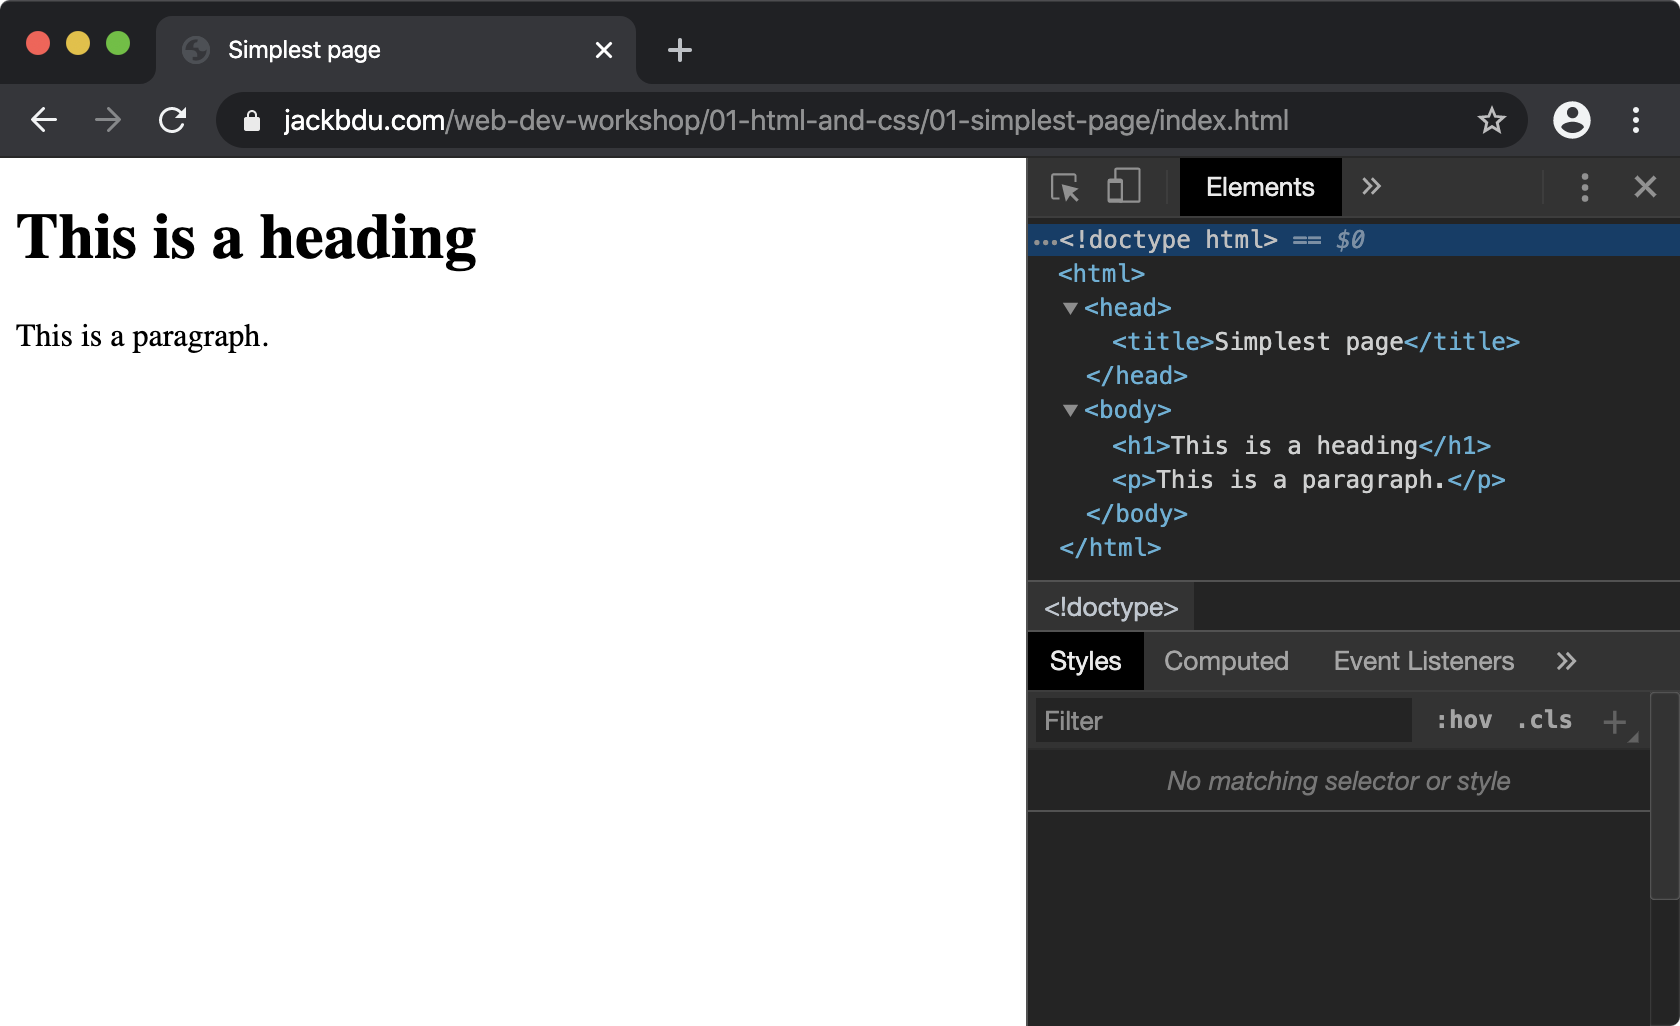
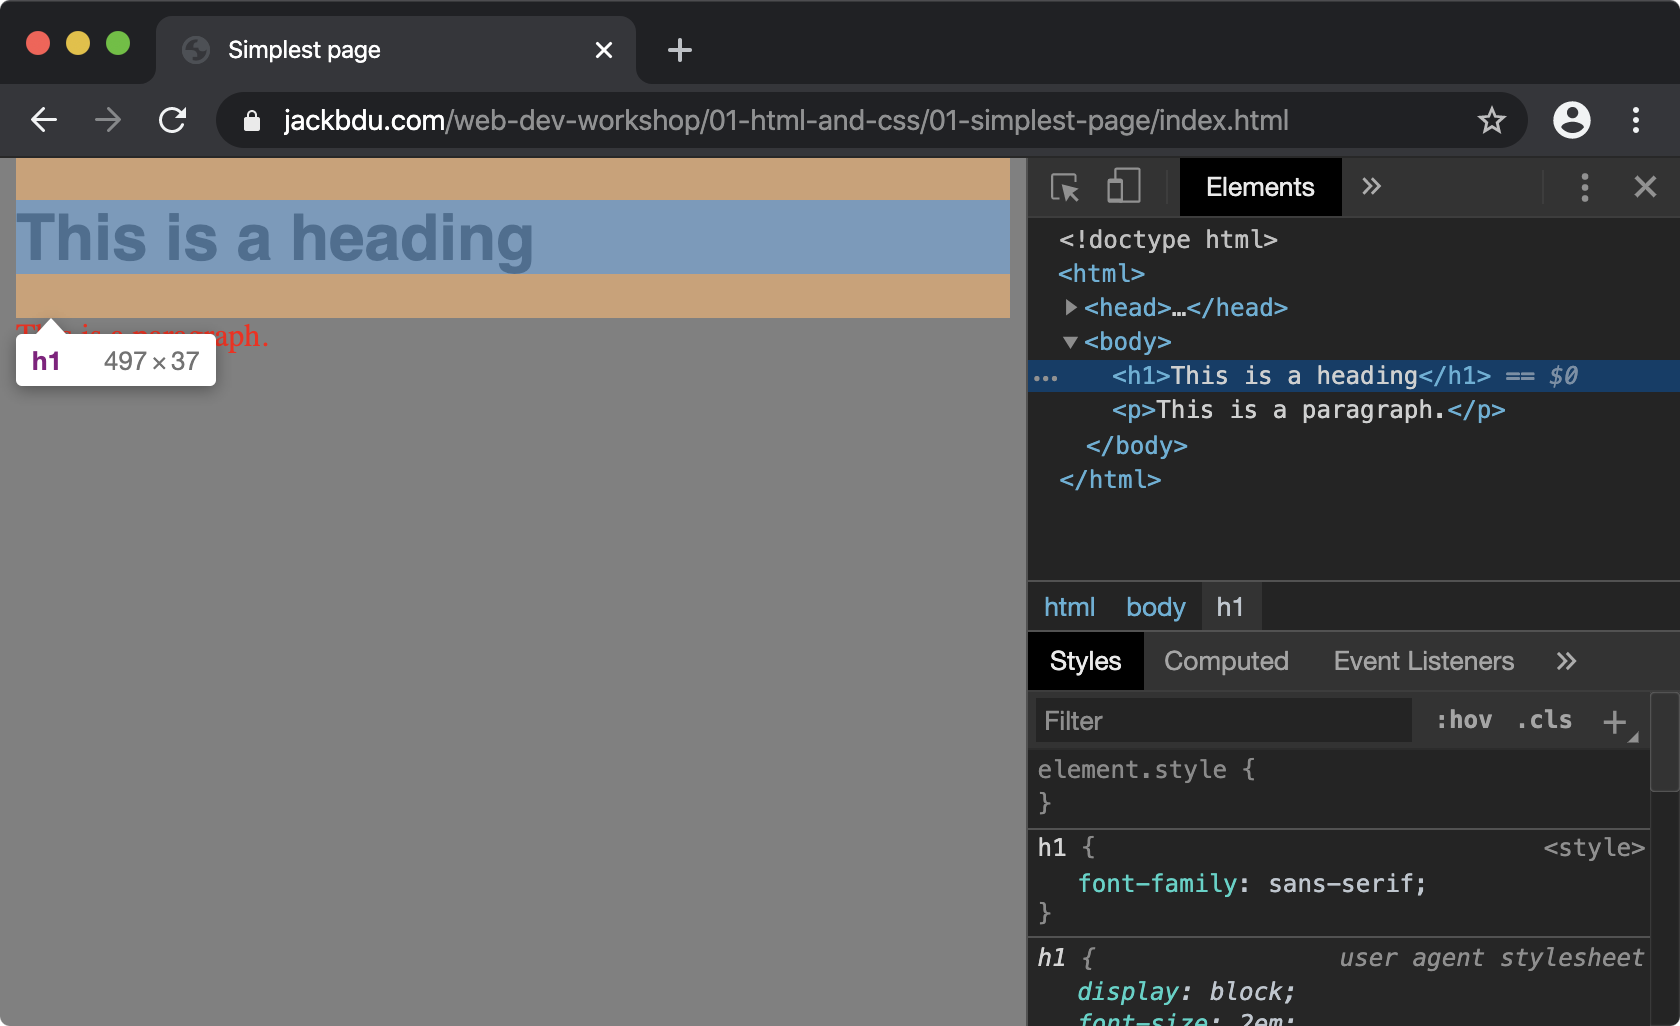
Inspecting HTML using Chrome DevTools
If you right click anywhere on a page in Google Chrome, you can then click Inspect to open Chrome DevTools. All the elements of the page will be visible in the Elements panel in an interactive fashion.
CSS
CSS describes the styles of the elements on a web page.
body {
  background: gray;
}

h1 {
  font-family: sans-serif;
}

p {
  color: red;
}
- CSS introduction: https://www.w3schools.com/css/css_intro.asp
- CSS tutorial: https://www.w3schools.com/css/default.asp
- CSS reference: https://www.w3schools.com/cssref/
- CSS default values reference: https://www.w3schools.com/cssref/css_default_values.asp
Inspecting CSS using Chrome DevTools
Once you are in Chrome DevTools, if you click on any element in the Elements panel, the relevant CSS code will show up in the Styles panel.
Hands-on - HTML
Simplest page
View the source code | View the page
<DOCTYPE! html> defines the document type to be HTML5.
<html></html> defines an HTML document, all HTML elements except for <DOCTYPE html> go in here.
<head></head> defines the information about the document, and elements in here do not show up on the page.
<title></title> defines the tile of the page, and shows up in the browser tab of the page.
<body></body> defines the body of the page. The elements in the body show up on the page.
<h1></h1> defines a heading.
<p></p> defines a paragraph.
- HTML doctype declaration: https://www.w3schools.com/tags/tag_doctype.asp
- HTML html tag: https://www.w3schools.com/tags/tag_html.asp
- HTML head tag: https://www.w3schools.com/tags/tag_head.asp
- HTML title tag: https://www.w3schools.com/tags/tag_title.asp
- HTML body tag: https://www.w3schools.com/tags/tag_body.asp
- HTML h1 to h6 tags: https://www.w3schools.com/tags/tag_hn.asp
- HTML p tag: https://www.w3schools.com/tags/tag_p.asp
Adding comments
View the source code | View the page
<!-- this is a comment in HTML -->
- HTML comment tag: https://www.w3schools.com/tags/tag_comment.asp
Adding an image
View the source code | View the page
<img src="path/to/image" alt="alternative text">
- HTML img tag: https://www.w3schools.com/tags/tag_img.asp
- HTML attributes: https://www.w3schools.com/html/html_attributes.asp
- Unsplash (royalty free photos): https://unsplash.com
Adding a list
View the source code | View the page
An unordered list
<ul>
  <li>Unordered Item 1</li>
  <li>Unordered Item 2</li>
  <li>Unordered Item 3</li>
</ul>
An ordered list
<ol>
  <li>Ordered Item 1</li>
  <li>Ordered Item 2</li>
  <li>Ordered Item 3</li>
</ol>
HTML Lists: https://www.w3schools.com/html/html_lists.asp
Adding a link
View the source code | View the page
<a href="relative/or/absolute/url">This is a link</a>
HTML a tag: https://www.w3schools.com/tags/tag_a.asp
Adding multiple sections
View the source code | View the page
<div>
  <h1>Section 1</h1>
  <p>Paragraph of section 1.</p>
</div>
<div>
  <h1>Section 2</h1>
  <p>Paragraph of section 2.</p>
</div>
- HTML div tag: https://www.w3schools.com/tags/tag_div.asp
- HTML header tag: https://www.w3schools.com/tags/tag_header.asp
- HTML nav tag: https://www.w3schools.com/tags/tag_nav.asp
- HTML main tag: https://www.w3schools.com/tags/tag_main.asp
- HTML article tag: https://www.w3schools.com/tags/tag_article.asp
- HTML aside tag: https://www.w3schools.com/tags/tag_aside.asp
- HTML footer tag: https://www.w3schools.com/tags/tag_footer.asp
A simple website
View the source code | View the page
A simple website that combines all of the above.
Hands-on - CSS
Using CSS
View the source code | View the page
Inline CSS
<p style="color: red;">This paragraph will be in red.</p>
Internal CSS
<!DOCTYPE html>
<html>
  <head>
    <style>
      p {
        color: red;
      }
    </style>
  </head>
  <body>
    <p>This paragraph will be in red.</p>
  </body>
</html>
External CSS
<!-- index.html -->
<!DOCTYPE html>
<html>
  <head>
    <link rel="stylesheet" type="text/css" href="style.css">
  </head>
  <body>
    <p>This paragraph will be in red.</p>
  </body>
</html>
/* style.css */
p {
  color: red;
}
- HTML style tag: https://www.w3schools.com/tags/tag_style.asp
- HTML link tag: https://www.w3schools.com/tags/tag_link.asp
- Difference Between the 3 Types of CSS Styles: Inline, External and Internal: https://www.hostinger.com/tutorials/difference-between-inline-external-and-internal-css#Internal-CSS
Adding comments
View the source code | View the page
/* this is a comment in CSS */
- CSS comments: https://www.w3schools.com/css/css_comments.asp
Changing colors
View the source code | View the page
body {
  background-color: lightgray;
}

h1 {
  color: rgb(255,0,0);
}

p {
  color: #0000ff;
}
- CSS color property: https://www.w3schools.com/cssref/pr_text_color.asp
- CSS background-color property: https://www.w3schools.com/cssref/pr_background-color.asp
- Colors tutorial: https://www.w3schools.com/colors/default.asp
- HTML color picker: https://www.w3schools.com/colors/colors_picker.asp
Modifying sizes
View the source code | View the page
h1 {
  font-size: 8em;
}

p {
  font-size: 10px;
}

img {
  width: 50%;
}
- CSS width property: https://www.w3schools.com/cssref/pr_dim_width.asp
- CSS height property: https://www.w3schools.com/cssref/pr_dim_height.asp
- CSS height and width dimensions: https://www.w3schools.com/css/css_dimension.asp
- CSS font-size property: https://www.w3schools.com/cssref/pr_font_font-size.asp
- CSS units: https://www.w3schools.com/cssref/css_units.asp
- Fun with Viewport Units: https://css-tricks.com/fun-viewport-units/
Adjusting spaces
View the source code | View the page
body {
  margin: 0;
  padding: 10vw;
  border-width: 1em;
  border-style: solid;
  border-color: gray;
}

h1 {
  padding: 2em;
  margin-bottom: 50px;
  border: 2px solid green;
}

p {
  margin: 15px;
  padding: 10px 0 0 10px;
  border: 1px dashed blue;
}

img {
  padding-top: 10px;
  border-top: 5px dotted red;
}
- CSS box model: https://www.w3schools.com/css/css_boxmodel.asp
- CSS margins: https://www.w3schools.com/css/css_margin.asp
- CSS borders: https://www.w3schools.com/css/css_border.asp
- CSS padding: https://www.w3schools.com/css/css_padding.asp
Styling using classes
View the source code | View the page
<div class="caption">
  <h1>Section 2</h1>
  <p>Paragraph of section 2.</p>
</div>
.caption {
  font-family: sans-serif;
  font-size: 0.8em;
  font-style: italic;
  color: darkgray;
}
- HTML classes: https://www.w3schools.com/html/html_classes.asp
- CSS .class selector https://www.w3schools.com/cssref/sel_class.asp
- CSS fonts: https://www.w3schools.com/css/css_font.asp
- CSS web safe fonts: https://www.w3schools.com/cssref/css_websafe_fonts.asp
- CSS reference: https://www.w3schools.com/cssref/
A simple styled website
View the source code | View the page
A simple styled website that combines all of the above.
- CSS text-align property: https://www.w3schools.com/cssref/pr_text_text-align.ASP
- CSS text-transformation property: https://www.w3schools.com/cssref/pr_text_text-transform.asp
- CSS text-decoration: https://www.w3schools.com/cssref/pr_text_text-decoration.asp
- CSS :hover selector: https://www.w3schools.com/csSref/sel_hover.asp
- CSS :last-child selector: https://www.w3schools.com/cssref/sel_last-child.asp
- CSS selector reference: https://www.w3schools.com/cssref/css_selectors.asp
- CSS flexbox: https://www.w3schools.com/css/css3_flexbox.asp
- A Complete Guide to Flexbox: https://css-tricks.com/snippets/css/a-guide-to-flexbox/
Publishing your website
There are many ways to publish your website, but one of the easiest way is with GitHub Pages. And it’s completely free!
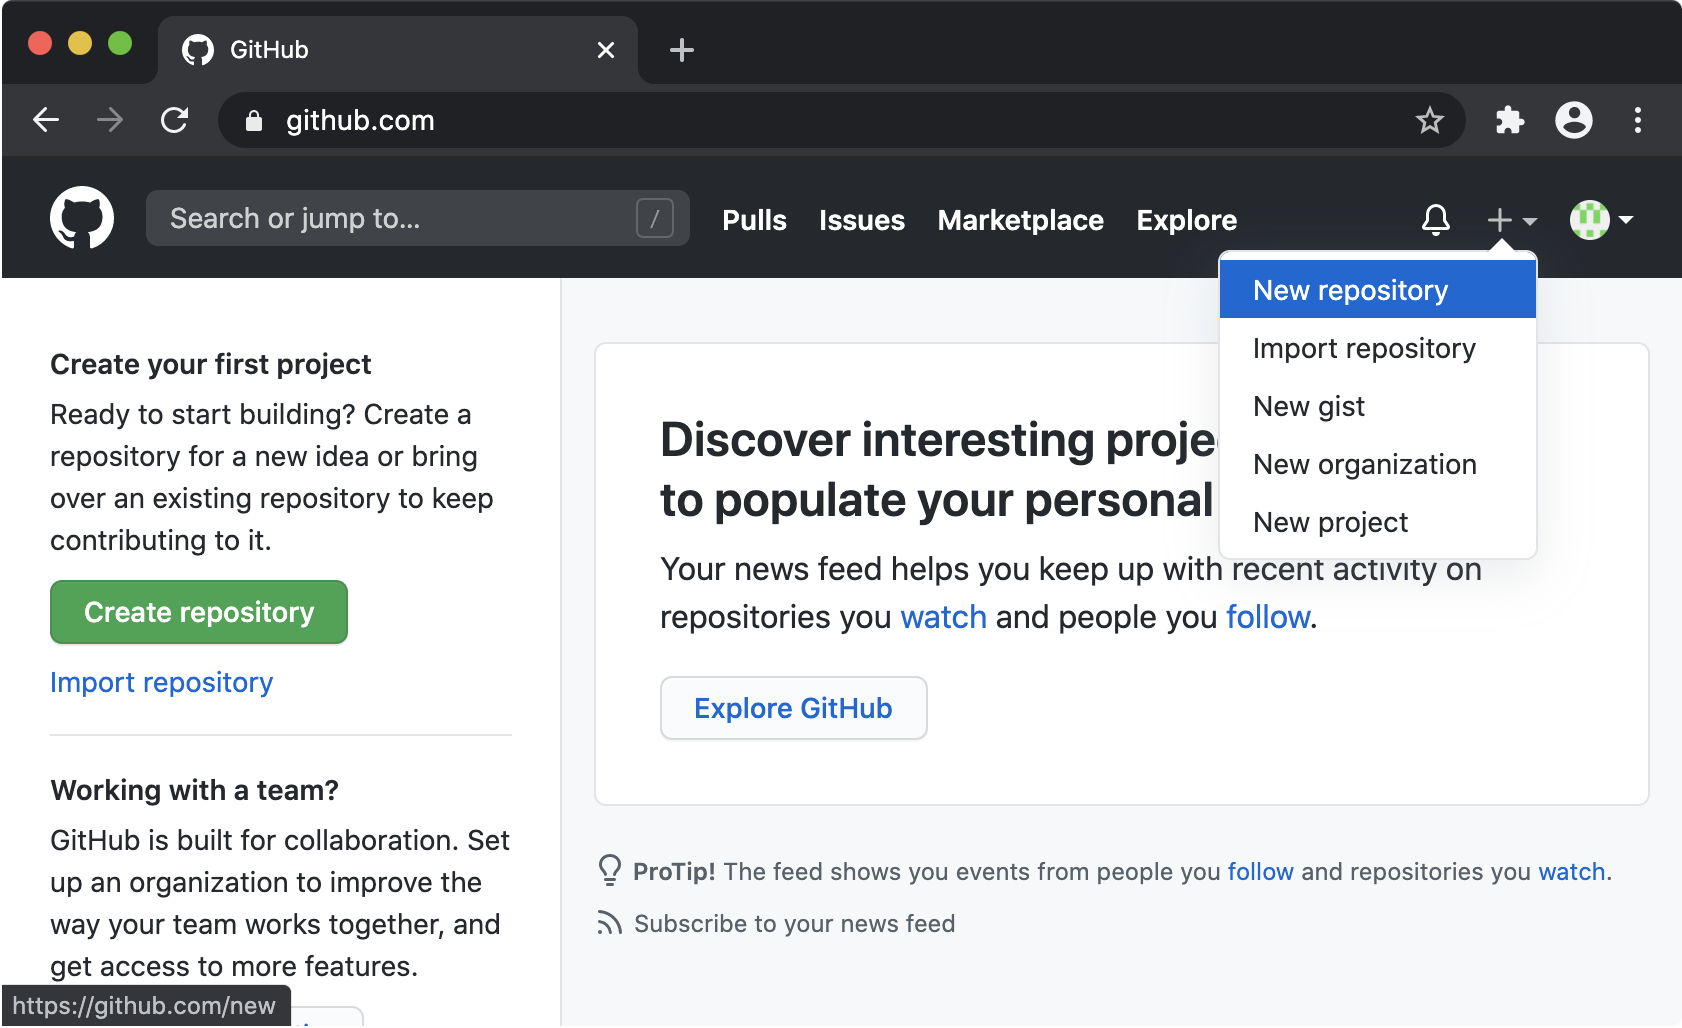
Creating a repository
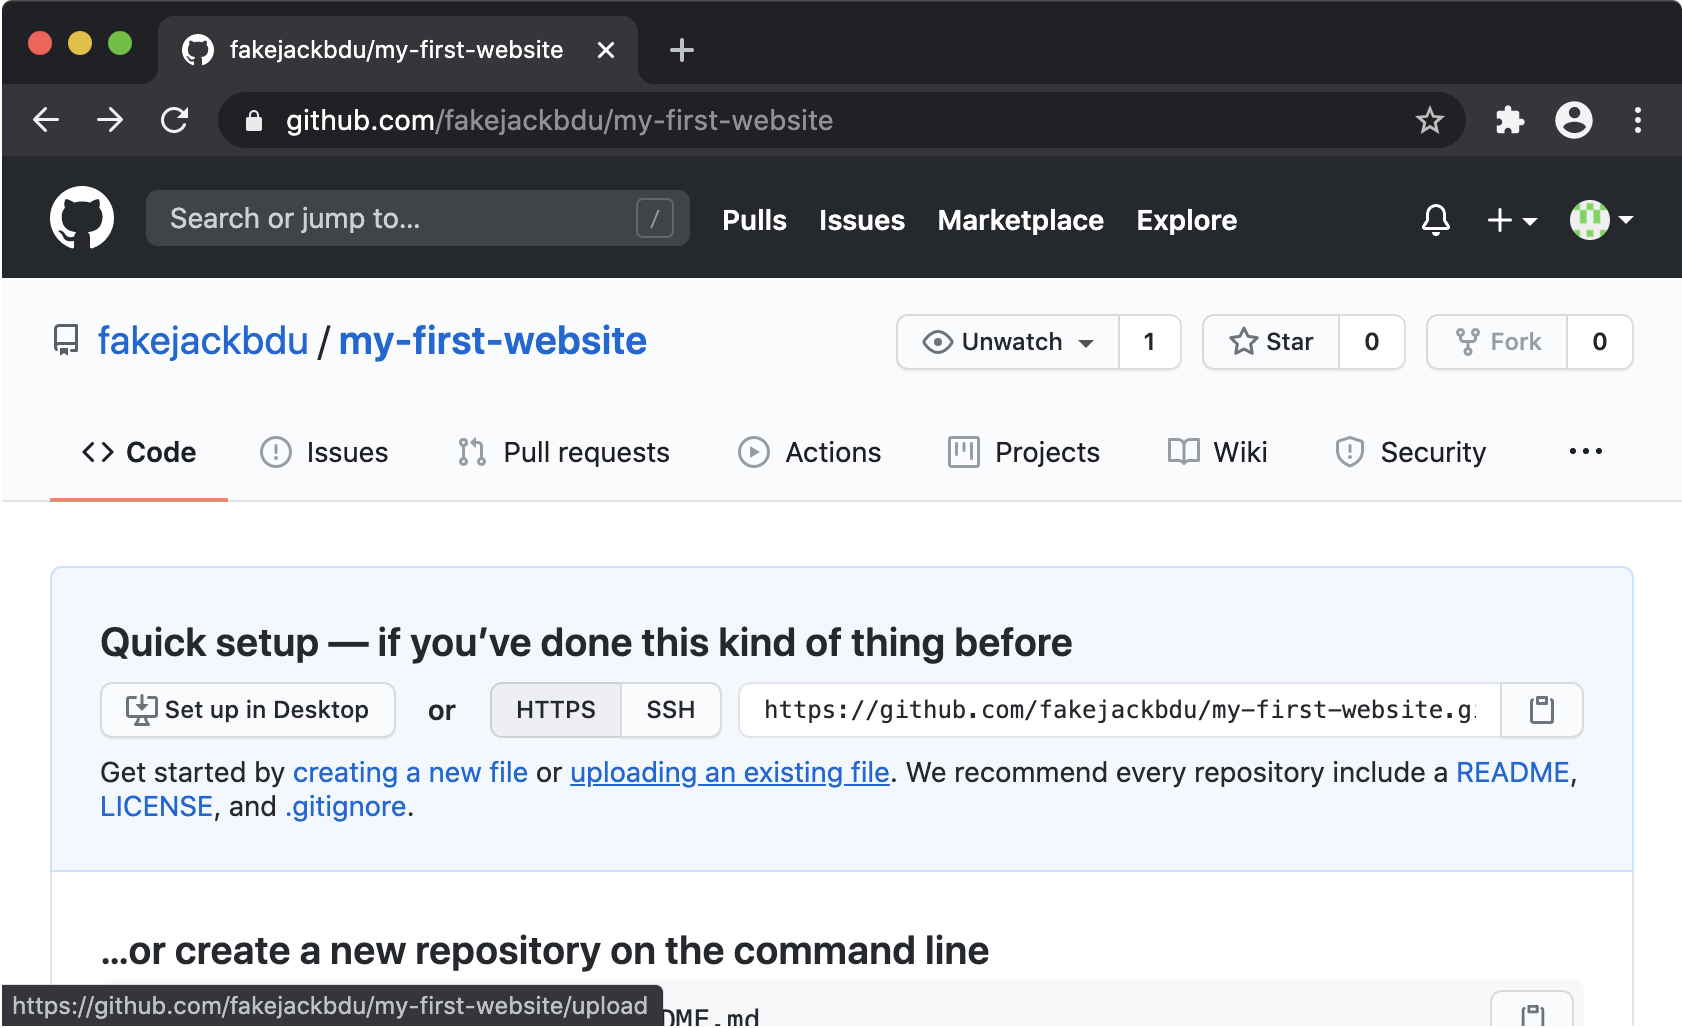
Go to github.com. Once logged in, click on the + icon and then New repository.
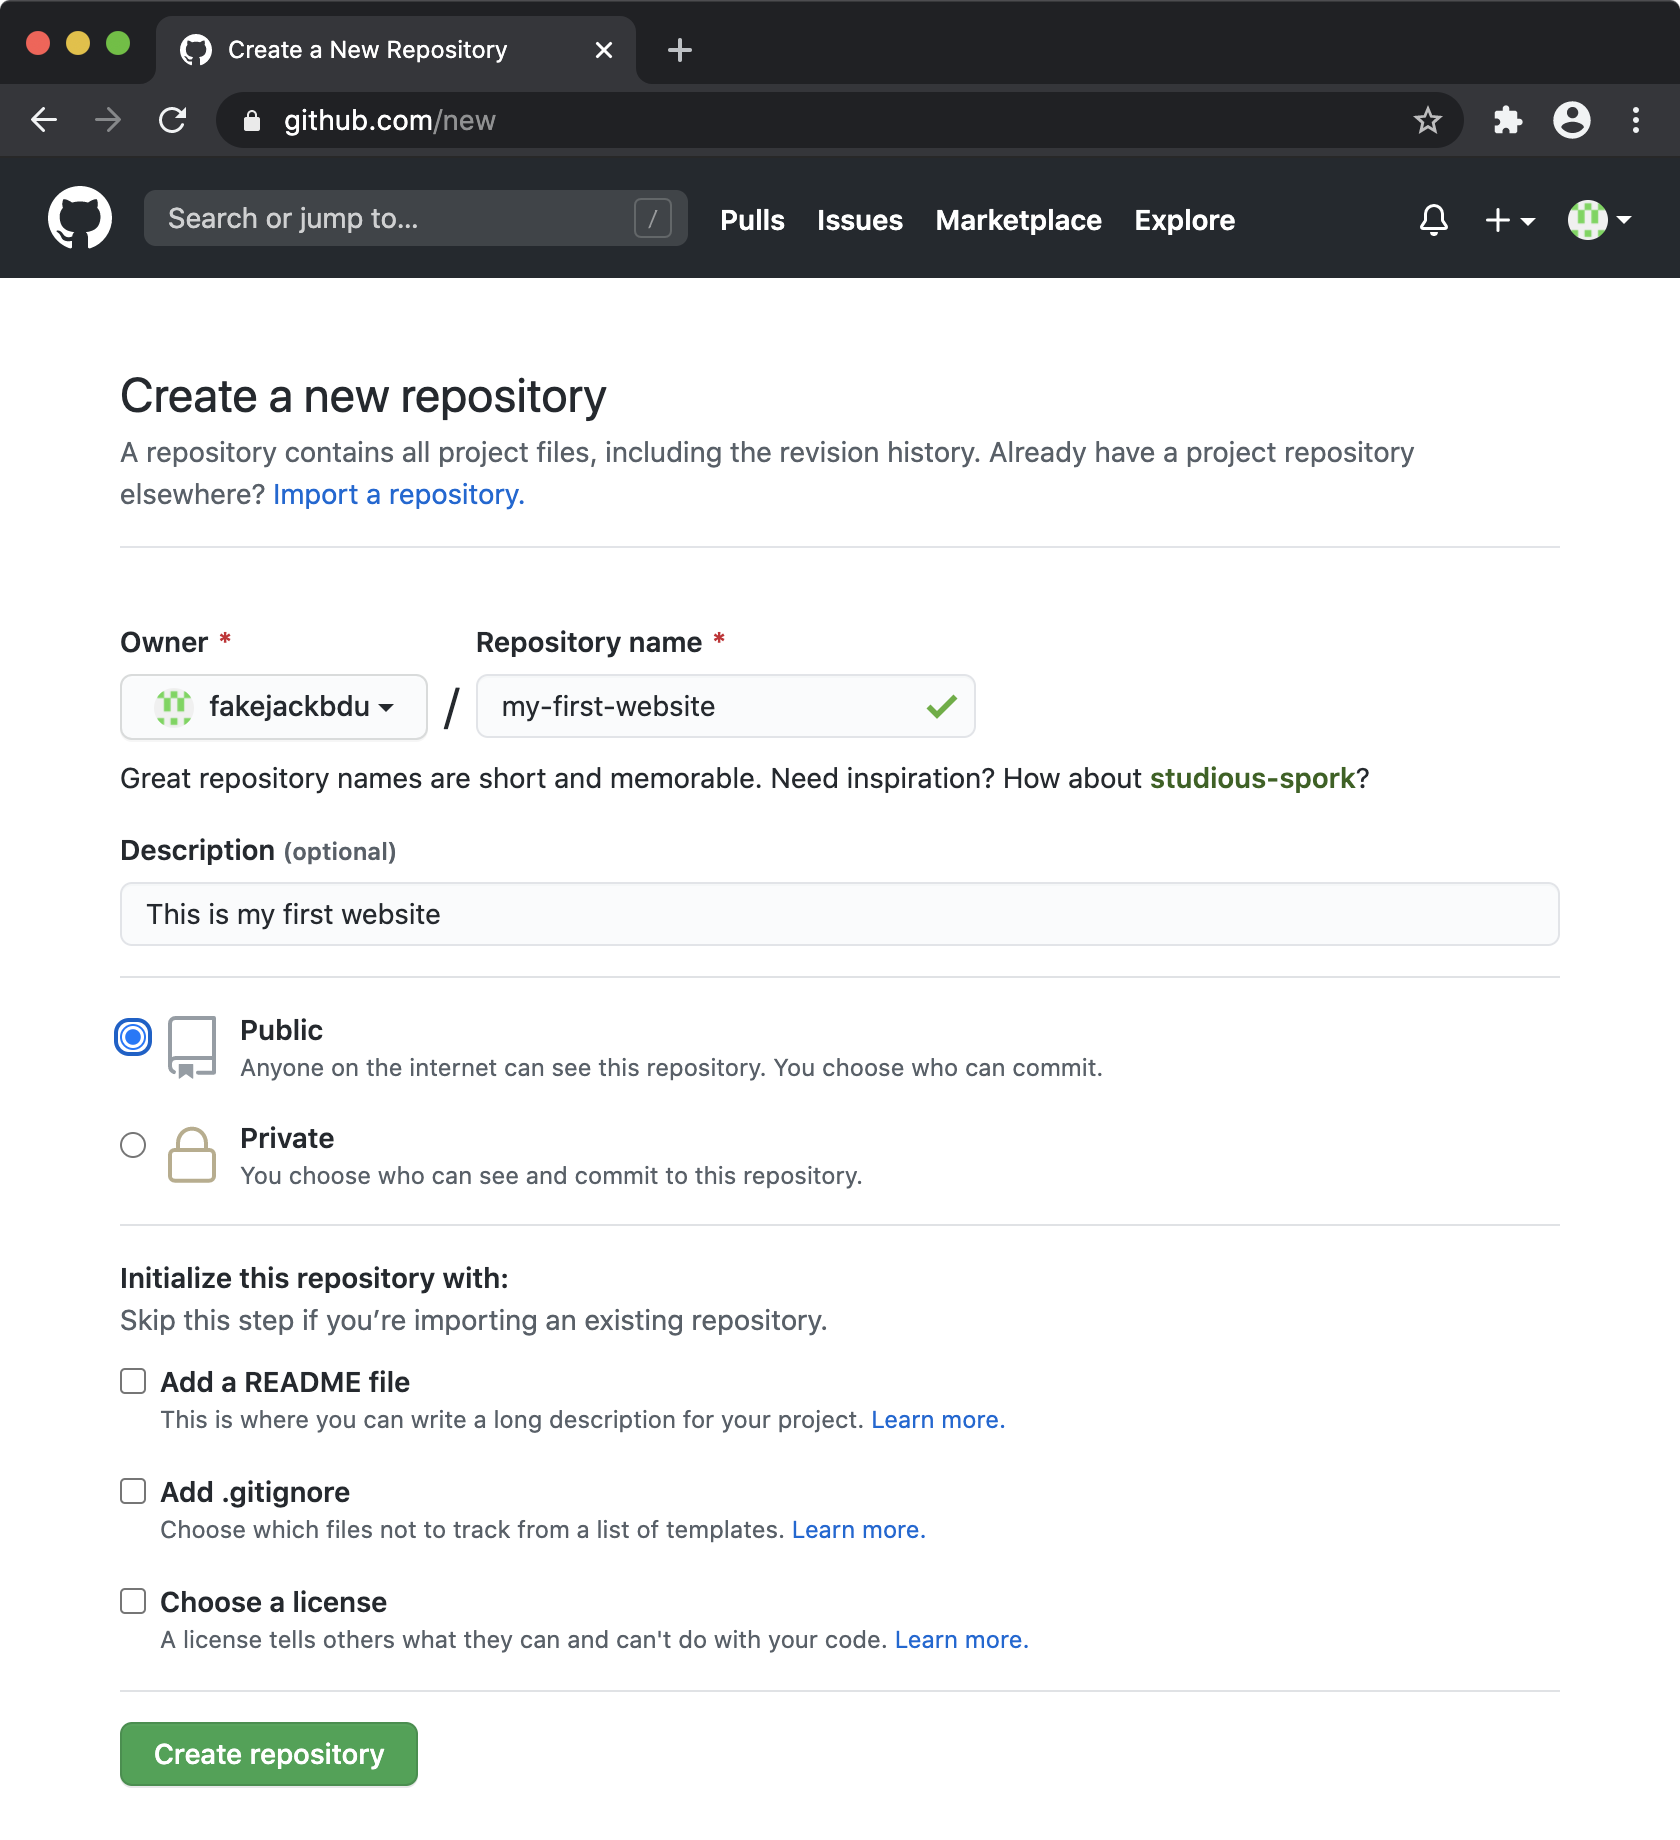
Enter Repository name and Description, then click Create repository.
Note that the repository name is going to be a part of the URL of the website you are going to publish, so lowercase words joined by hyphens is generally a good format.
Uploading the files
Once the repository is created, click uploading an existing file.
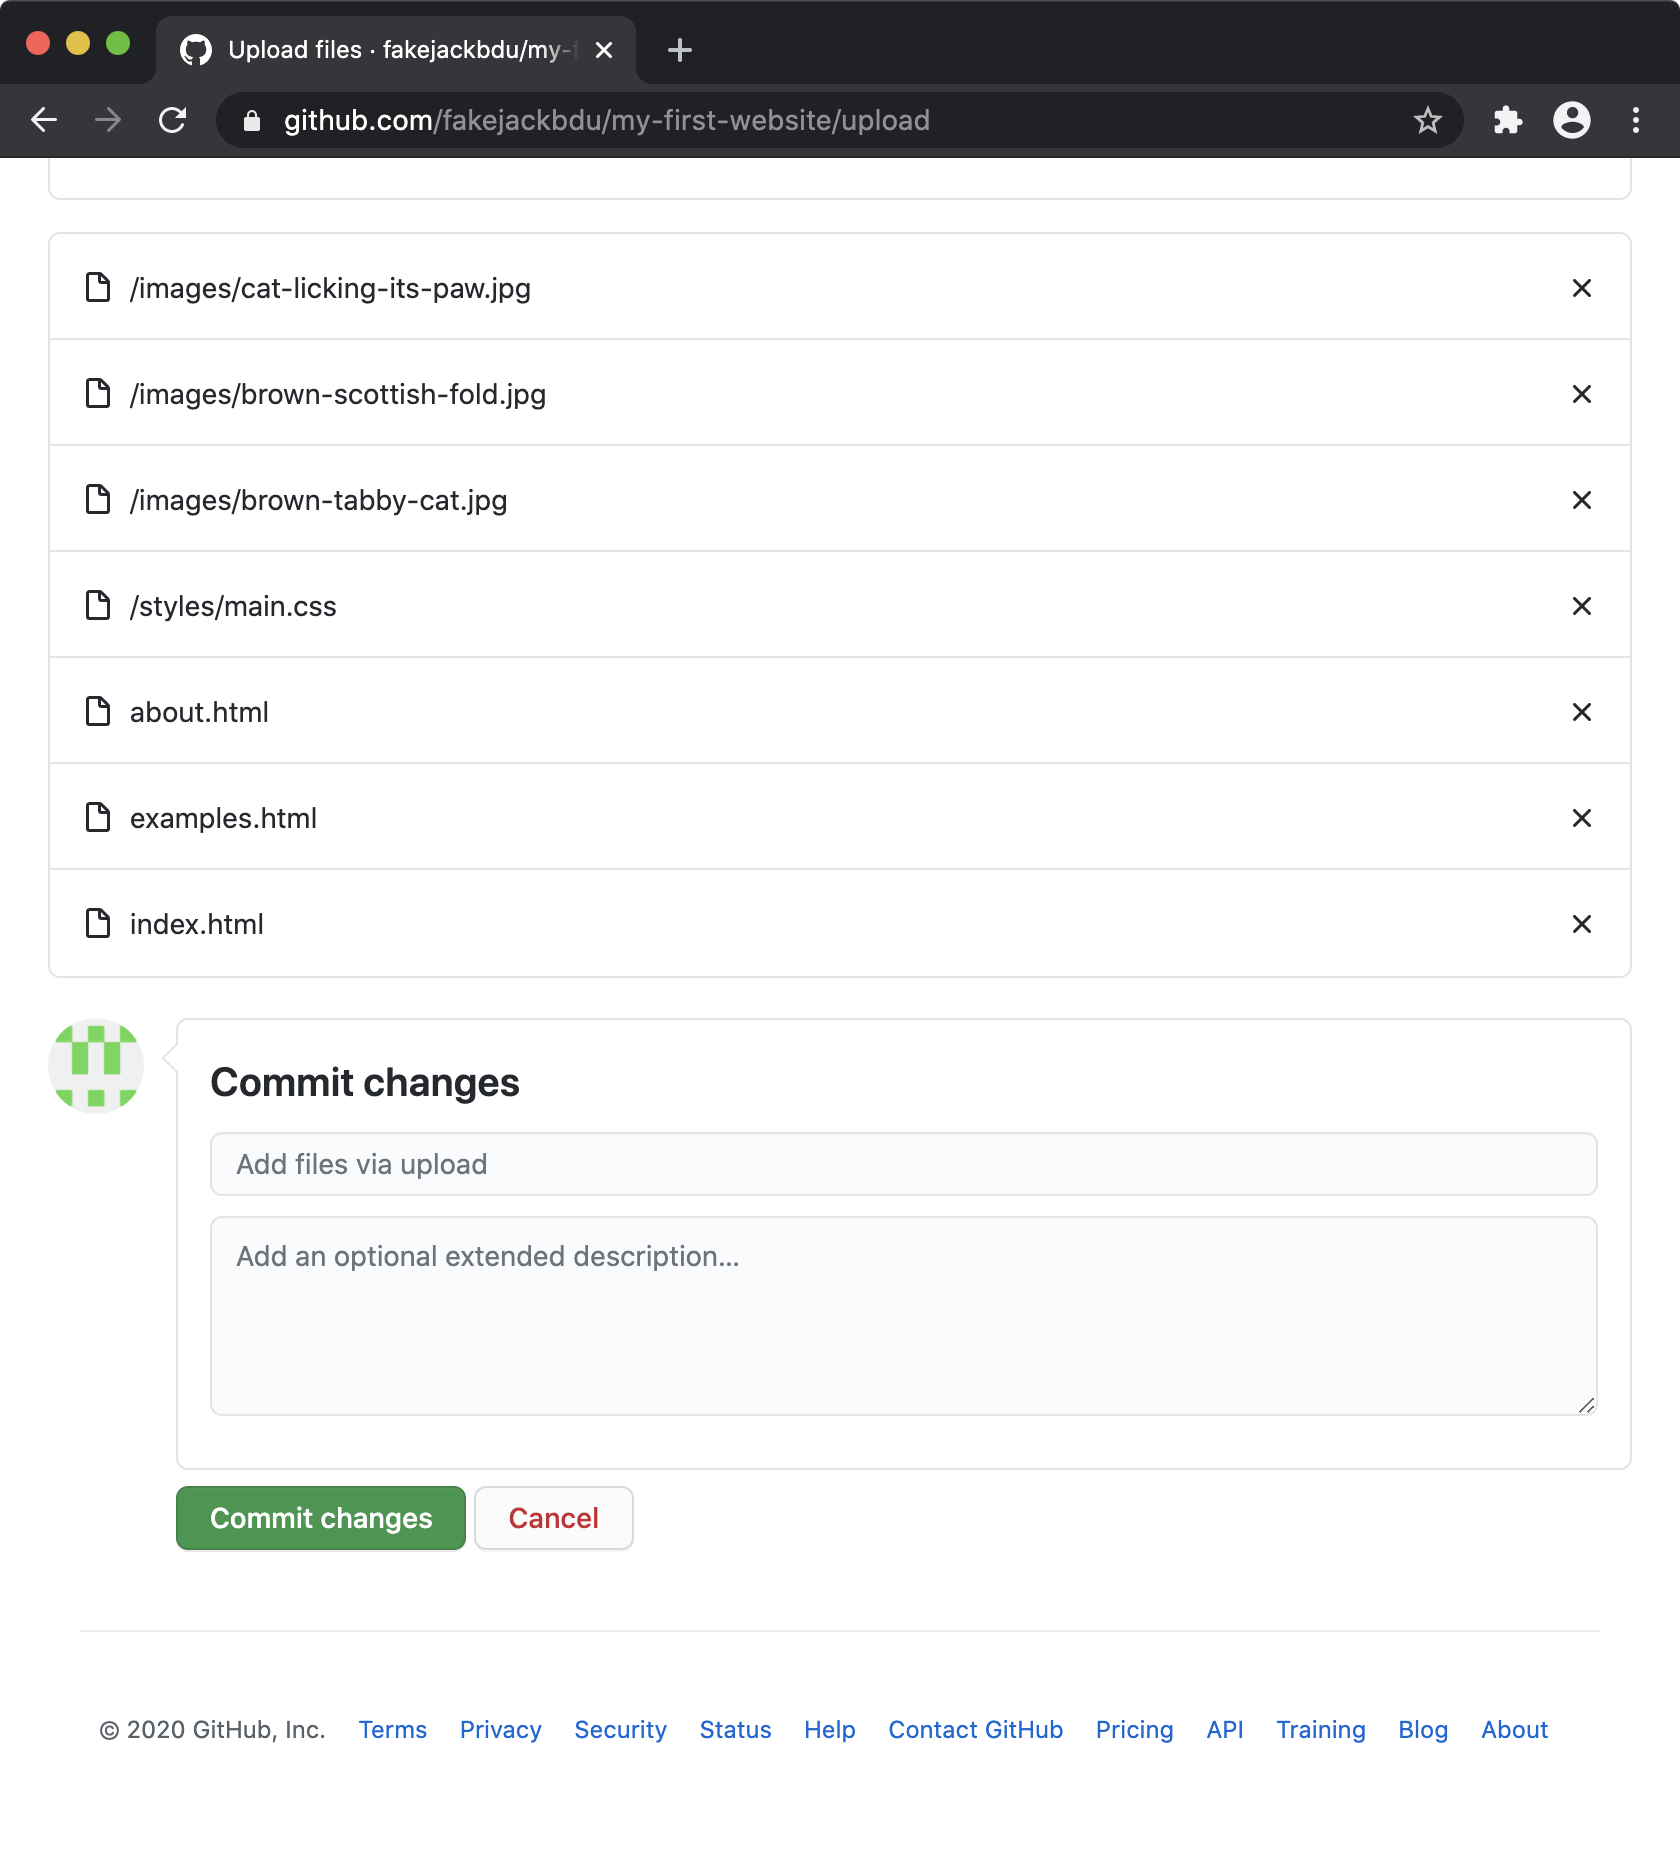
The easiest way to upload your website is to select all the files (including .html files, .css files, and the image files, etc.) and drag them to the area as indicated below.
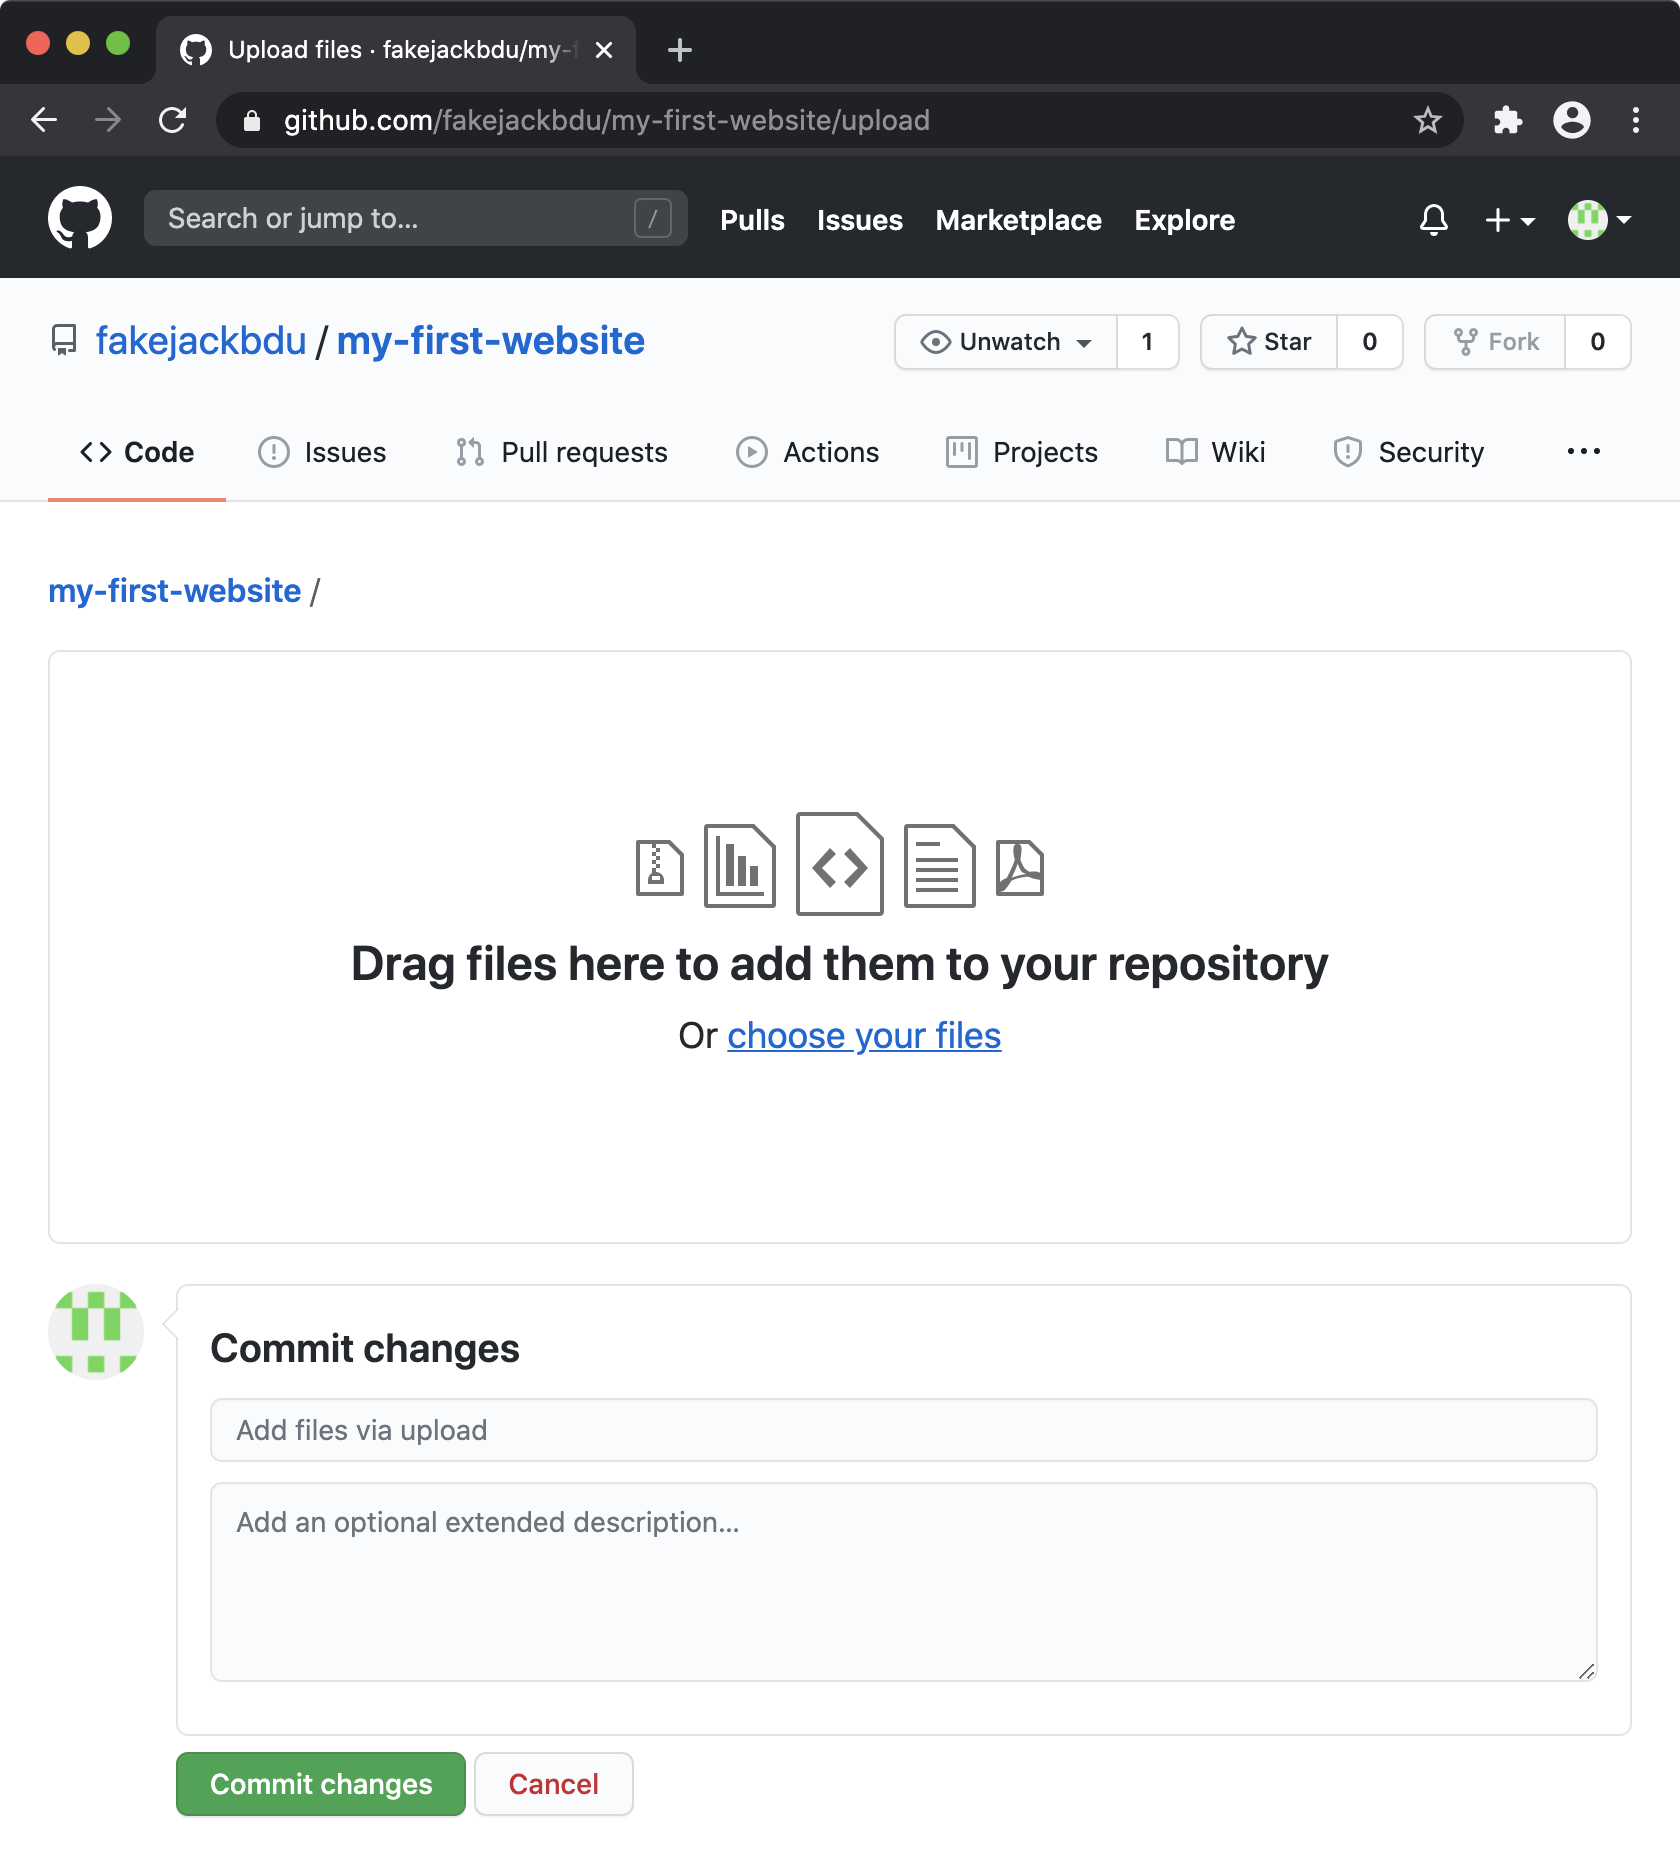
Wait until all your file names appear on this page, then click Commit changes to confirm the upload.
Optionally, you can add some comments to this upload so it will be easy for you to track this upload in future.
Publishing with GitHub Pages
It may take a few minutes for the files to be uploaded depending on your file sizes and your internet connection.
Your files are ready when you see something similar to the page below, and then you can go to Settings.
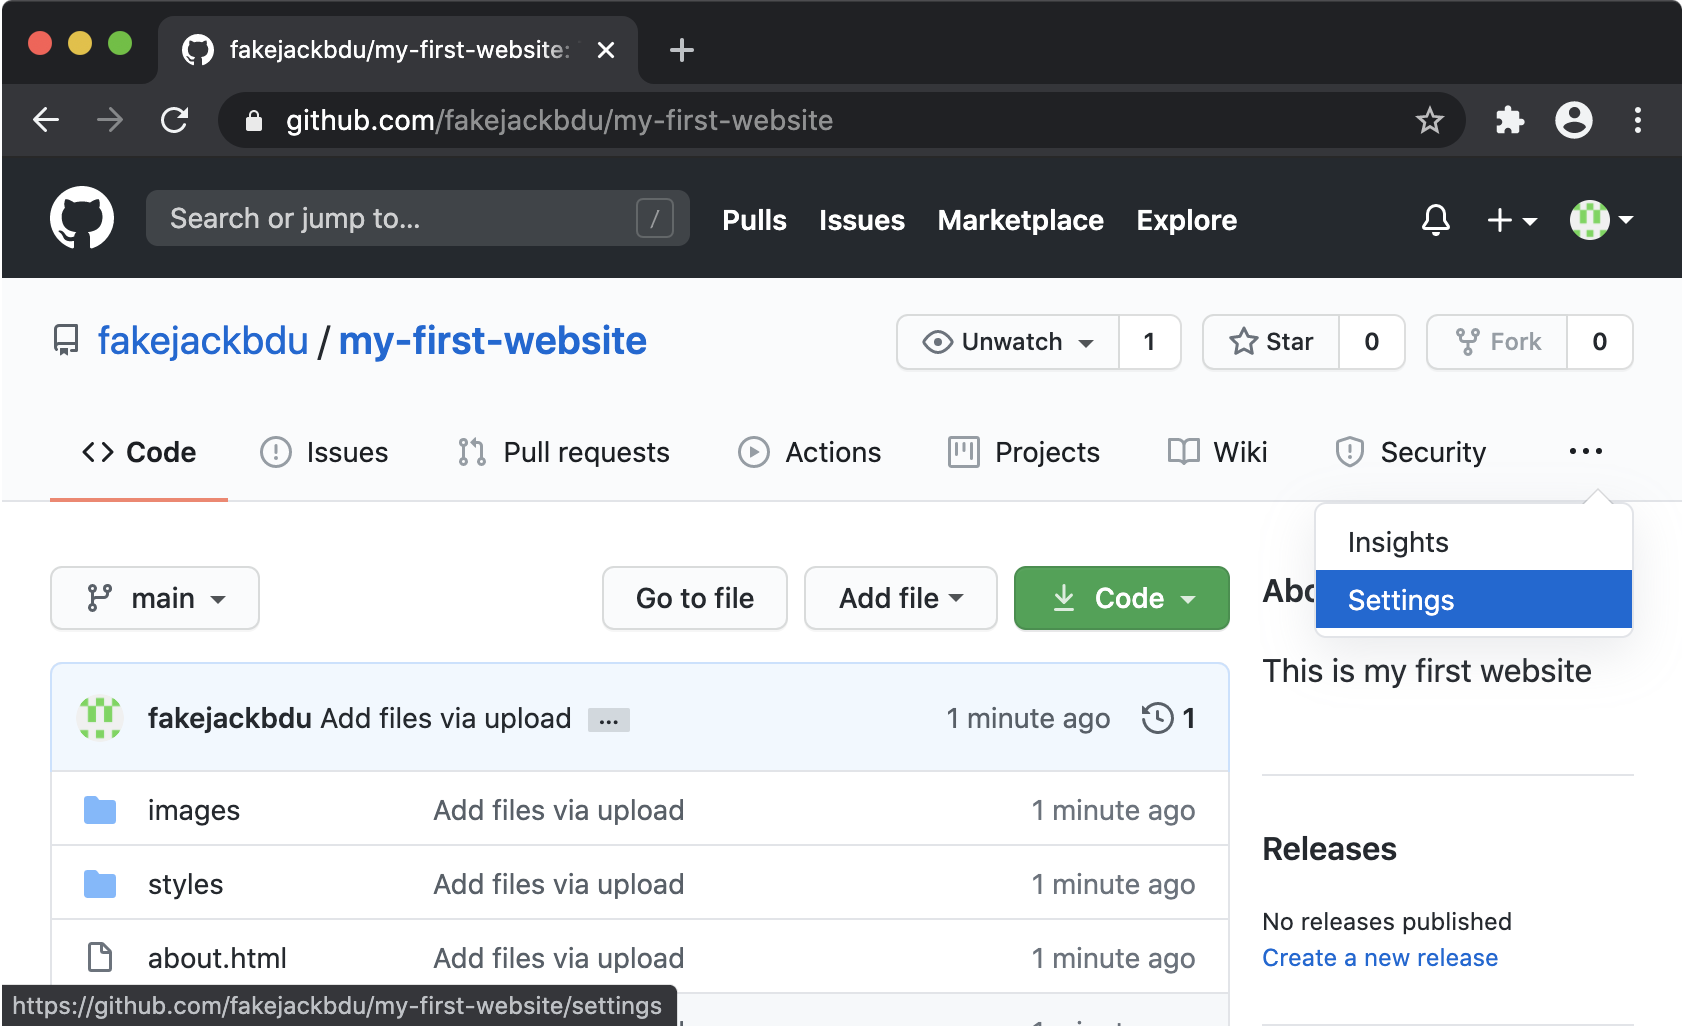
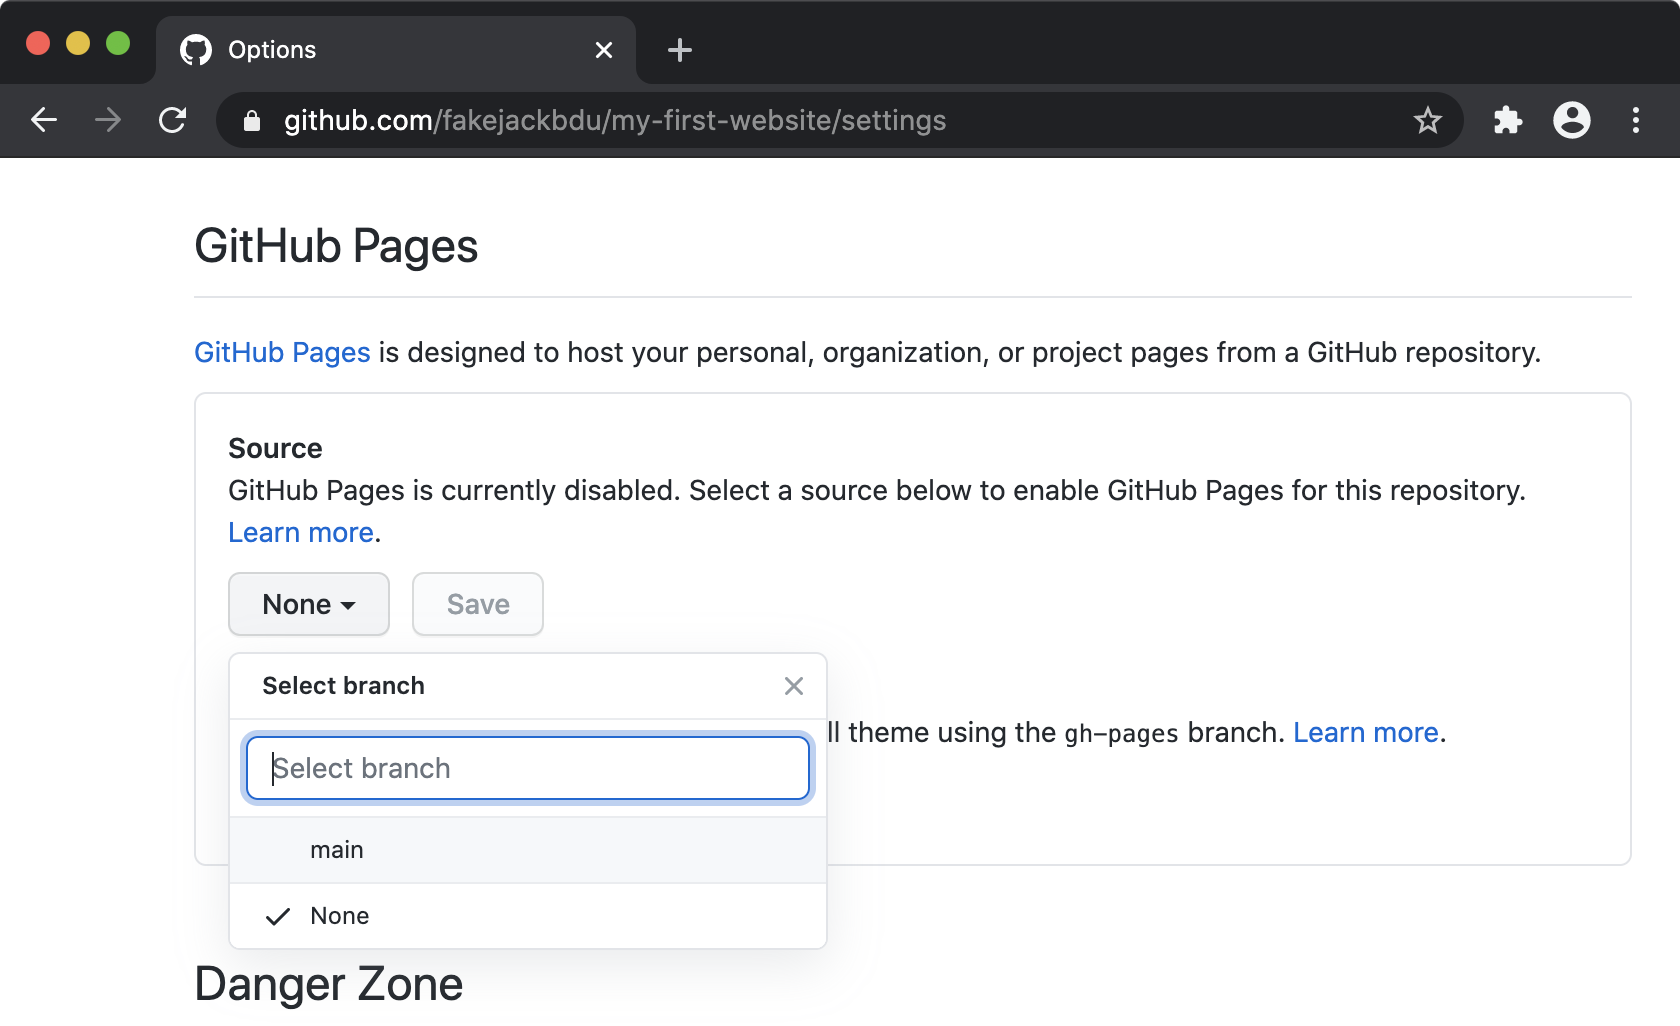
On the Settings page, scroll all the way down, you will see the section GitHub Pages. Click on None and select main (the default branch where you have uploaded all your files to) as the source.
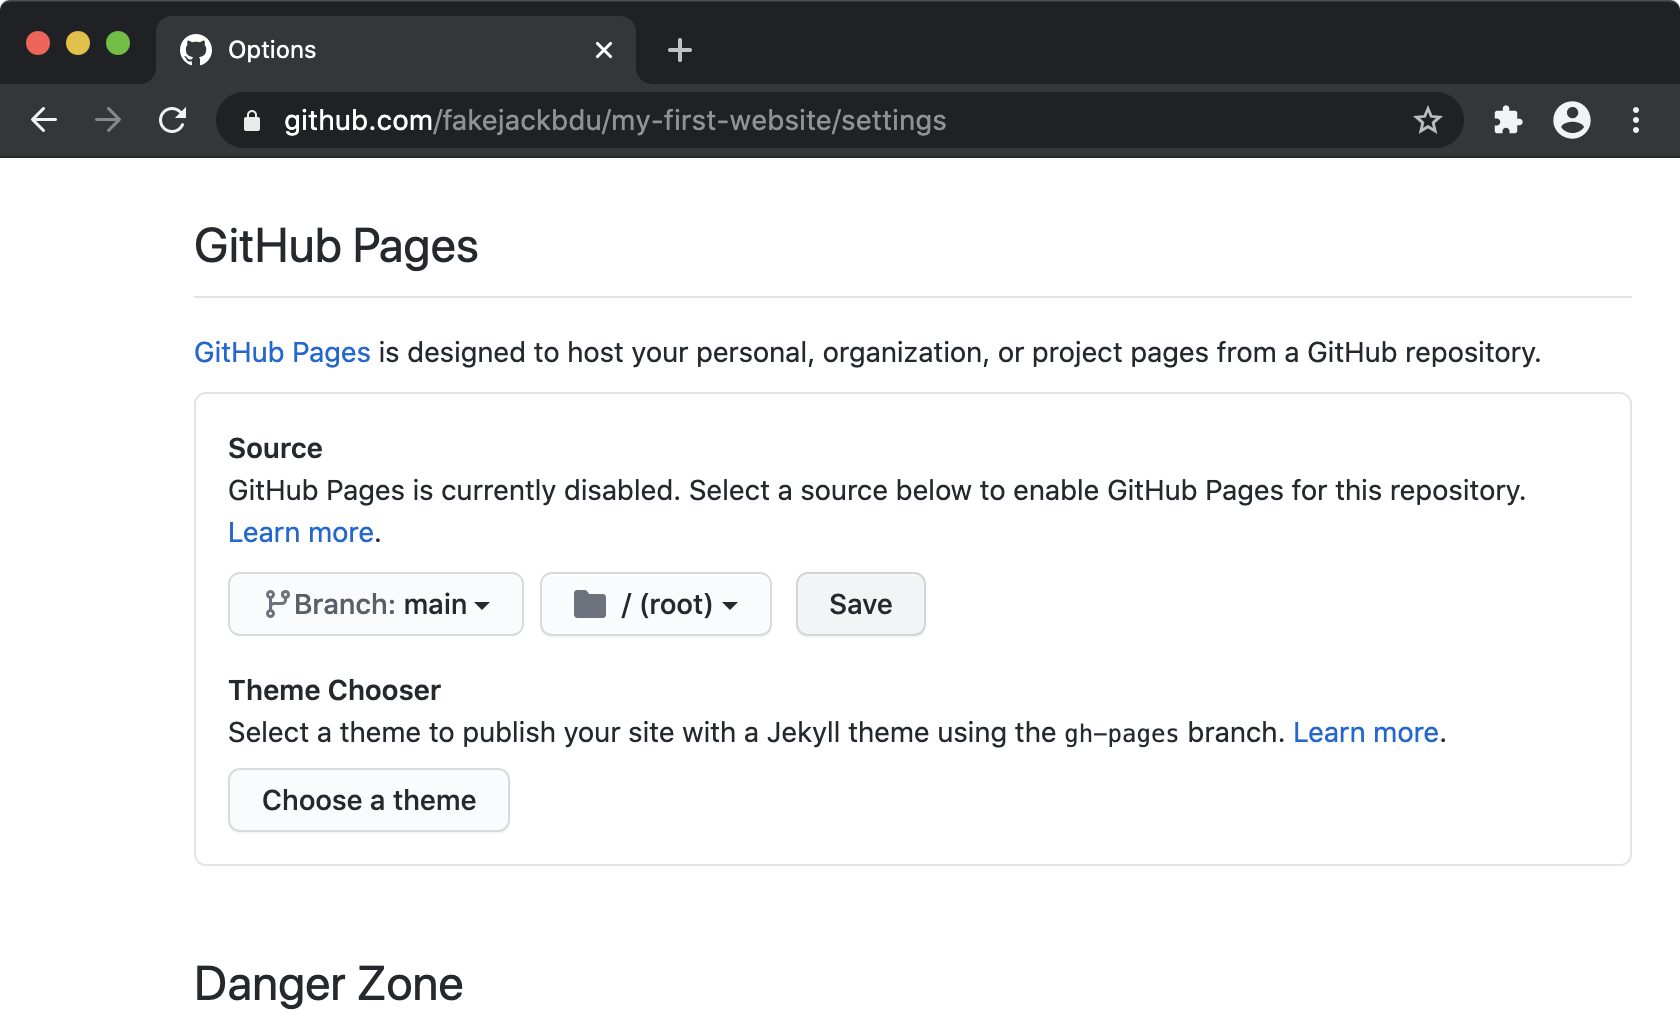
Click Save to confirm your source selection.
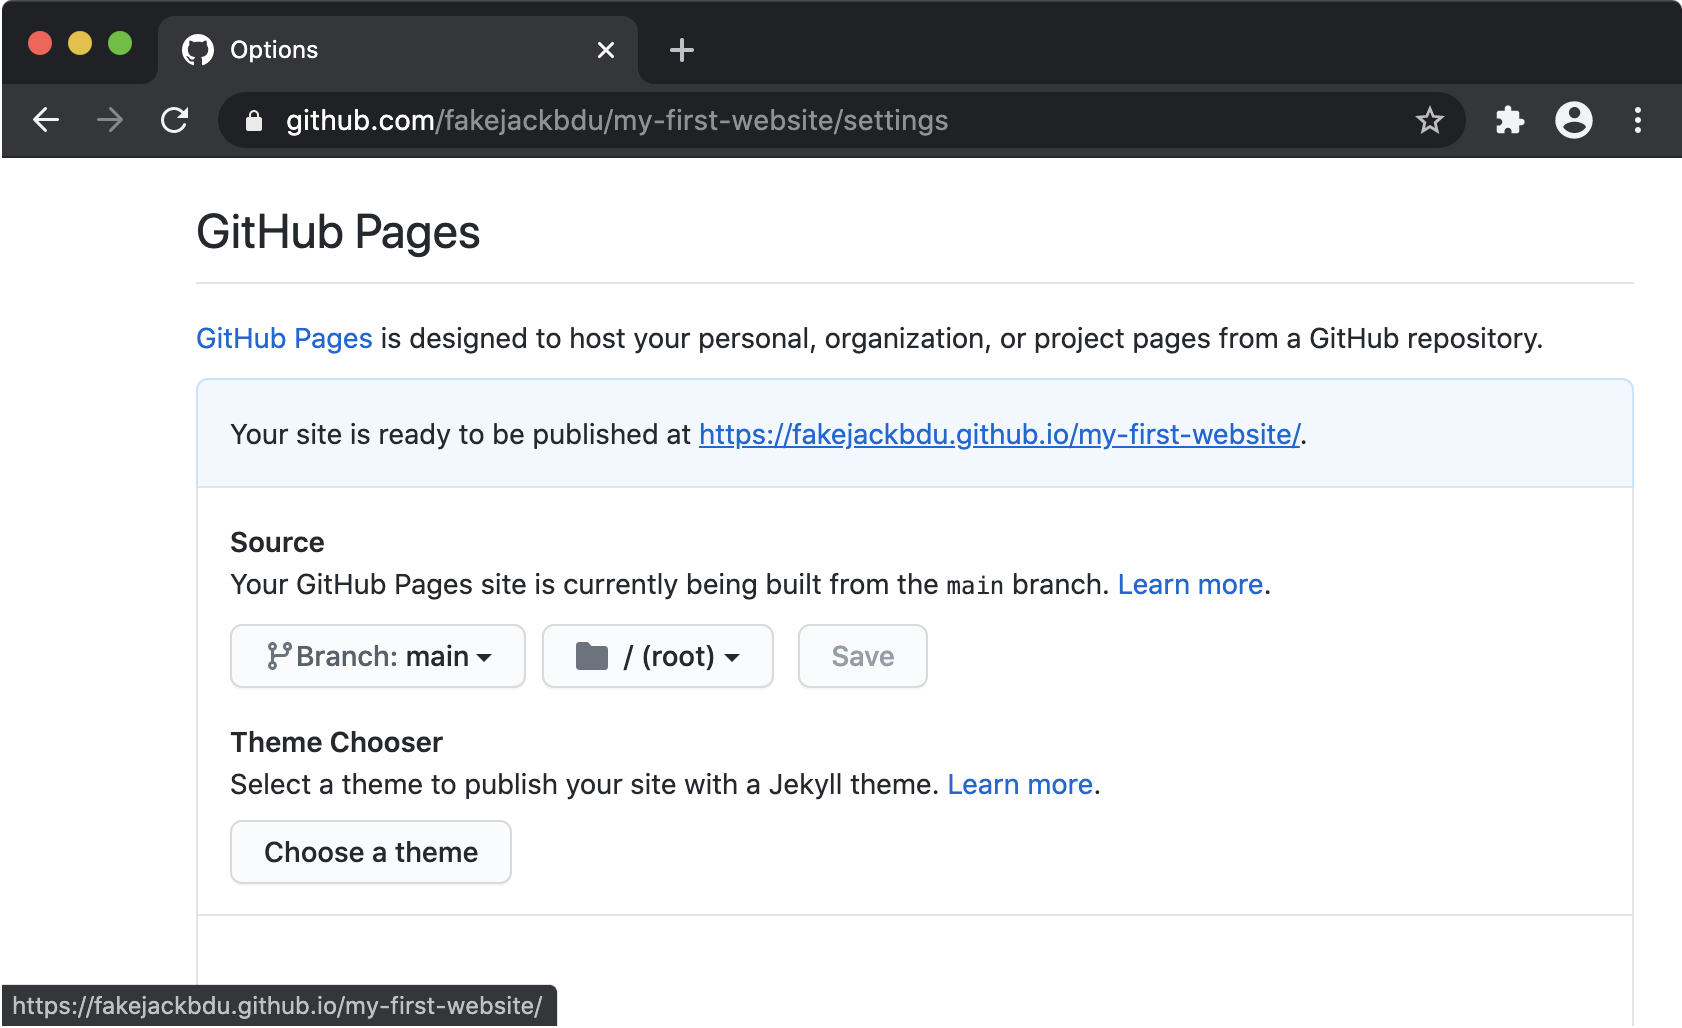
Once saved, if you scroll down to the section GitHub Pages again, you will see a link that will take you to your published website.
Note that the URL of your website should look like this: your-username.github.io/your-repository-name.
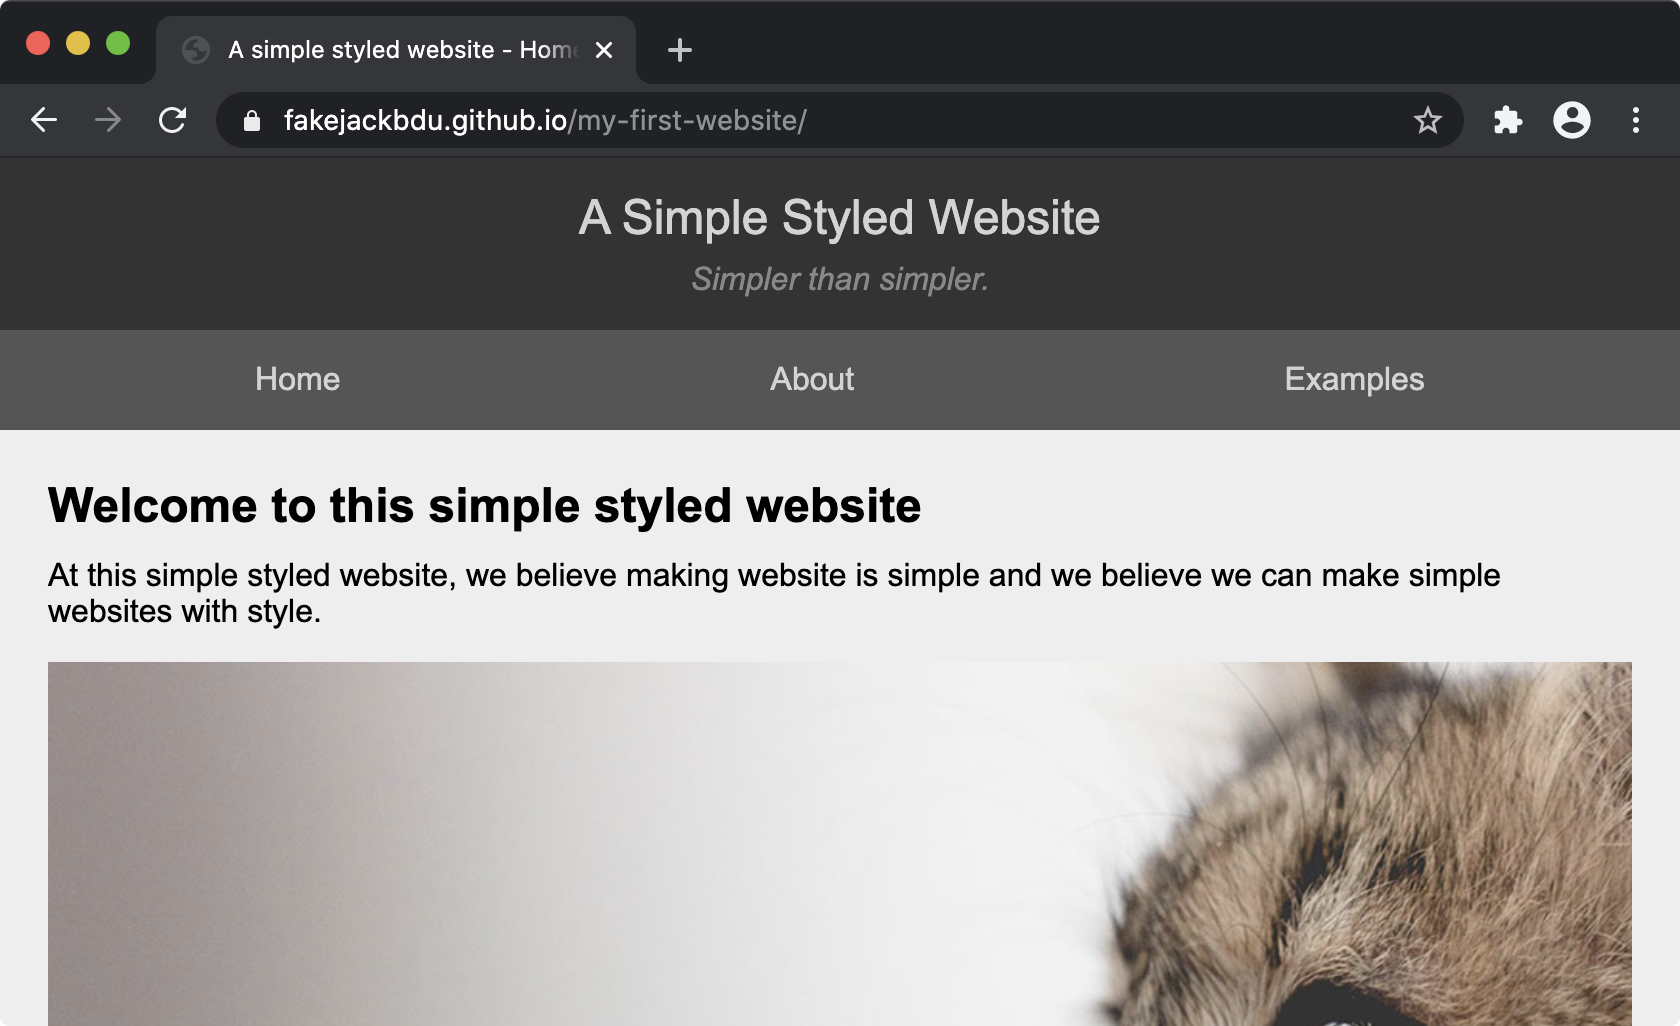
Woohoo, you just published your first website and you can share this with anyone that has internet access!
Suggested Homework
- Find a simple webpage that you really like
- Try to replicate the overall layout using HTML
- Try to replicate the styles using CSS
- Google if there are elements of the chosen webpage that you do not know how to replicate
- Use Google Chrome to inspect the underlying HTML and CSS of the chosen webpage only when necessary
- Make notes of the problems that you cannot fix on your own and bring them to the next workshop