p5.js Fundamentals
0.0 Code Editor
One of my favorite things about p5.js is that it runs on the web, which means we can create an entire project without leaving our web browser. The p5.js Web Editor, originally created by Cassie Tarakjian, is the official code editor for p5.js supported by the Processing Foundation.
Let’s start by opening the p5.js Web Editor in a new tab.
0.0.1 Account and Settings
Though not required, if you are following along this tutorial, I highly recommend creating an account by clicking Sign up at the top-right corner of the web editor.
After signing up, we’ll be able to save our projects (a.k.a sketches) in our account, which reduces the likelihood of us losing our hard-written code. (Yes, one can only reduce such likelihood, because there is always a creative way to lose code. Fret not, later I will share a few techniques to further reduce the possibility of such heart-broken moments.)
In addition, we’ll be able to save our editor preferences, which can be found by clicking the gear icon ![]() at the top-right corner. Below is a screenshot of my settings:
at the top-right corner. Below is a screenshot of my settings:

I personally prefer a dark theme whenever I code because I will be staring at my screen quite a lot and I’d rather not have bright light shining into my eyes.
The only other setting that I change is Autoclose Brackets and Quotes. When this is On, the editor automatically closes our opening brackets such as (, [, { by adding their cooresponding closing brackets such as ), ], }, which we will be using a lot in coding. In theory, this helps us avoid incomplete brackets, but in my experience, beginners tend to be confused about the unexpected brackets. Personally, I also prefer to type my own brackets so I know exactly what I am typing.
Ultimately, all these settings are up to you as long as you are aware what they are.
0.0.2 Interface
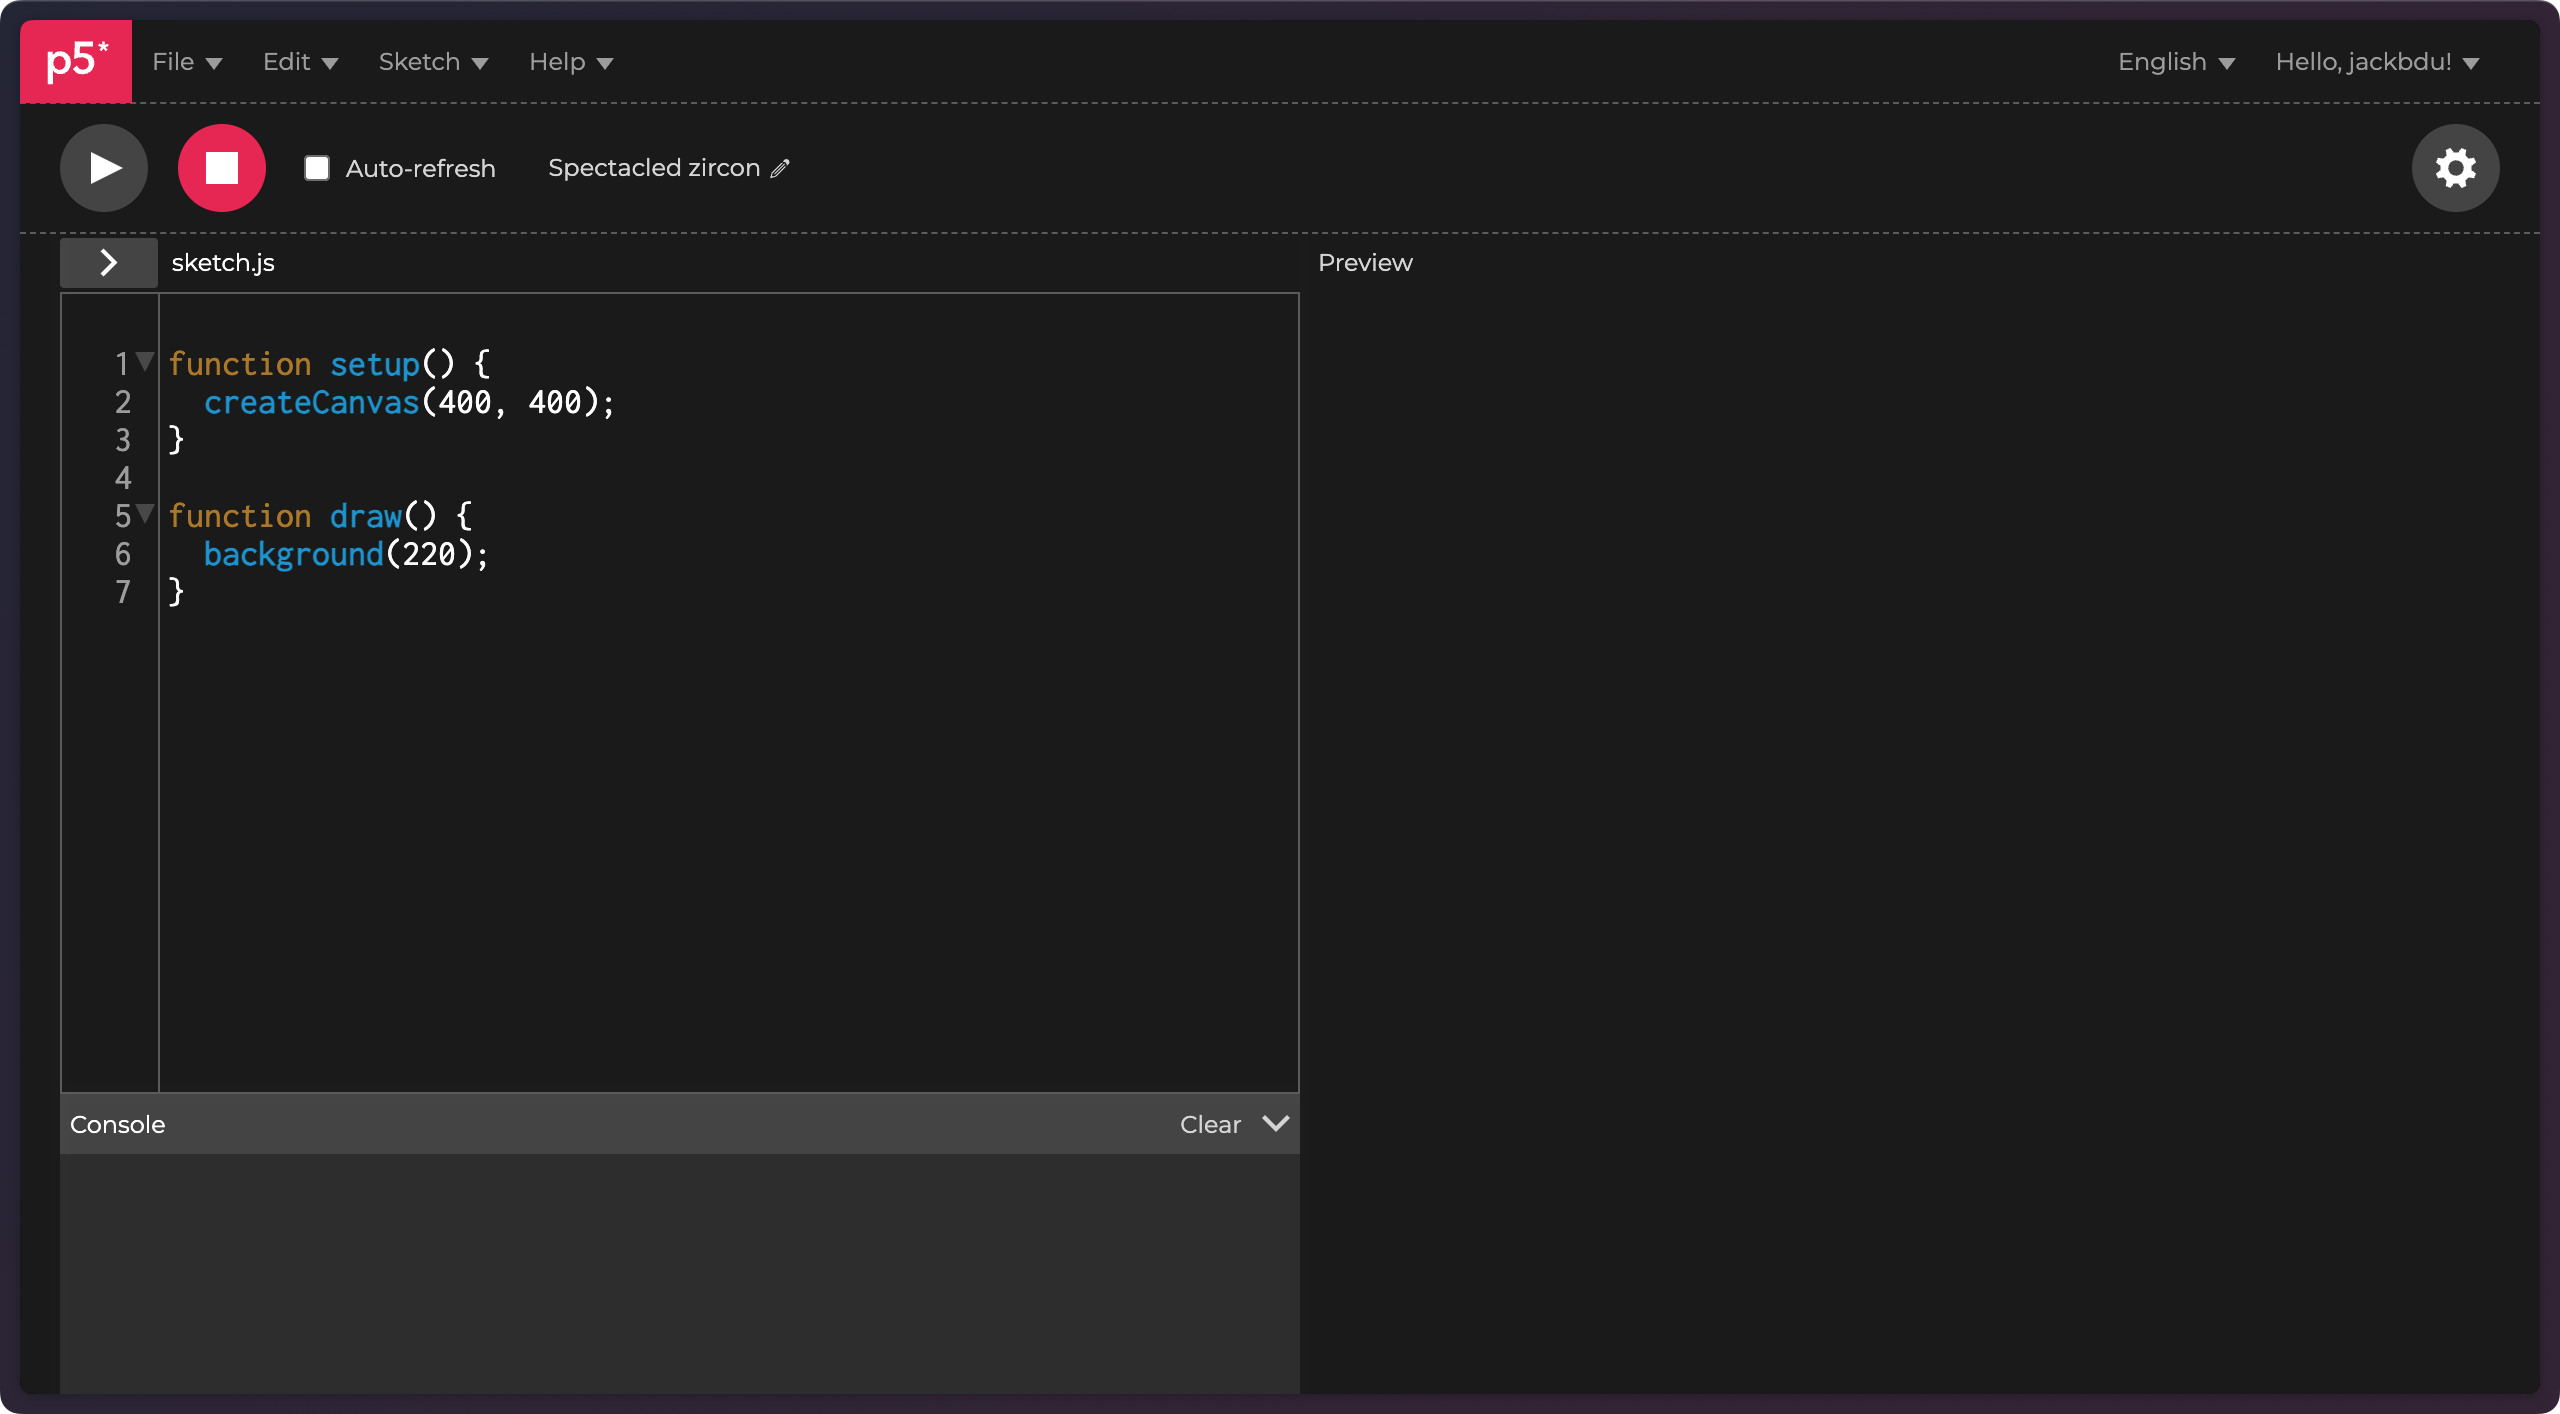
Upon opening the web editor, we see a menu bar at the very top, which include submenus that allow us to create new sketch, save current sketch, find and replace text, etc.
Right below that, there is a play button ![]() , a stop button
, a stop button ![]() , and a pencil icon
, and a pencil icon ![]() next to some generated text, which is where we can edit the name of our sketch. Let’s give our sketch a good name and click File > Save in order to save our sketch.
next to some generated text, which is where we can edit the name of our sketch. Let’s give our sketch a good name and click File > Save in order to save our sketch.
Finally, we are getting to the largest sections of the editor. One the left-hand side, we see sketch.js and some text with numbered lines, this is where we will be viewing and editing the source code. Right below that, we see Console, which is where we will see messasages (such as log or error messages) from our sketch. On the right-hand side, we see Preview, which displays a preview of our sketch when we click the play button ![]() . A sketch is essentially a webpage, so the preview is essentially a preview of the webpage. Most of the time, we will be dealing with a
. A sketch is essentially a webpage, so the preview is essentially a preview of the webpage. Most of the time, we will be dealing with a canvas on this webpage, which is webpage component (technically, it’s called an HTML <canvas> element, but we don’t really need to worry about it right now).
Note that new changes to the source code will not be reflected in the preview until the play button ![]() is clicked again unless Auto-refresh is enabled. (I do not recommend enabling it as it may cause our browser to freeze in some cases. Remember that I told you I will share more tips on saving our precious code?)
is clicked again unless Auto-refresh is enabled. (I do not recommend enabling it as it may cause our browser to freeze in some cases. Remember that I told you I will share more tips on saving our precious code?)
0.1 Default Sketch
If you are opening the web editor for the first time, or whenever you create a new sketch, you’ll see some code like this:
function setup() {
  createCanvas(400, 400);
}

function draw() {
  background(220);
}
First things first, setup() and draw() are called functions. We can probably guess that because they are preceded by the keyword function. We’ll learn more about functions later, but for now, we only need to know that functions usually perform some actions. More specifically, setup() and draw() are two functions that p5.js recognize and their main differences lie in how often they run (i.e. how often their actions are carried out). Since p5.js is primarily used for visuals, we can think of the sketches as paintings. The setup() function does the preparation work (hence runs only once before draw()) whereas the draw() function actively and repeatedly paint things onto our canvas until we stop our sketch or until we explicitly ask it to stop.
Now, let’s take a closer look at the setup() function. It is followed by a opening curly brace {, which is later closed by its matching closing curly brace }. Everything between { and } specifies exactly what the setup() function does (i.e. the code to run). In this case, createCanvas(400, 400);. One line of code like this ended with a semicolon ; is called a statement. This statement, as you guessed it, creates a canvas for us to draw on. What are the two numbers? You might be able to guess, but we can also learn by trial and error. What if we change the statement to createCanvas(200, 400) and run the sketch again (by clicking the play button ![]() )? What about
)? What about createCanvas(400, 150)? Hopefully, by now, you have realized that the first number represents the width of the canvas and the second number represents the height of the canvas.
Congratulations! You have just learned how to program, and you are ready to embark the rest of the journey on your own!
Hehe, not so fast? If you are still here, let’s embark on this journey togther!
Similarly, within the draw() function, we can try changing the number in the statement background(220); and run the sketch to see what this number does. For instance, background(100); appears to make the canvas darker, and background(255) appears to make the canvas lighter. What about background(300); or background(400);? Do they make the canvas even lighter? The answer is no. That is because, in p5.js, colors are represented on a scale from 0 to 255 by default with 0 being solid black and 255 being solid white.
Now we know what createCanvas() and background() do, but what are they? It turns out they are also functions. However, you might have noticed that they are not preceded by the keyword function, why? The keyword function is actually used to create new functions. That is to say, setup() and draw() functions do not exist until we write function setup() { ... } and function draw() { ... } in our code, whereas createCanvas() and background() are functions that already exist in p5.js. Whenever we see a function without the keyword function, it is called to call or invoke a function, which means to use that function to perform its prescribed actions. Additionally, createCanvas() and background() can use these comma-separated numbers (called arguments) to affect its actions.
To recap, in the default sketch source code, we are creating two functions, one named setup() and the other named draw(), which are standard functions that are recognized by p5.js. setup() runs only once and draw() runs continously immediately afterwards. Within setup(), createCanvas(400, 400); creates a canvas with a width of 400 pixels (first number) and height of 400 pixels (second number). Within draw(), background(220); draws a light-gray background on the canvas.
0.2 Write Our Own Code
Now that we’ve understood the default sketch, let’s dig in and write our own code.
0.2.1 Shapes
First off, let’s try to draw a circle on the canvas. In order to do that, we add a circle() function inside the draw() function as below:
function setup() {
  createCanvas(400, 400);
}

function draw() {
  background(220);
  circle(200, 200, 100);
}
Now we have a circle at the center of the canvas. Notice how I put this statement after background(220);? If I swap them, and put circle(200, 200, 100); before background(220);, we won’t see a circle. Why? That is because statements are excuted sequentially. You see the circle if you draw the background first, but you won’t see the circle if you draw the circle first, because the background will cover the circle that we draw (imagine painting the entire canvas over with light-gray paint after paint a circle first).
Following a similar trial-and-error approach, we can try changing each argument and see what happens. We’ll quickly learn that the first argument affects the horizontal position of the circle, the second argument affects the vertical position of the circle, and the last argument affects the size of the circle. If you happen to have learned the Cartesian coordinate system in geometry, it is not hard to tell that the first argument represents x and the argument represents y. However, if you are look closely, you may notice that the y axis here is the opposite. In p5.js, by default, the origin of its coordinate system is at the top-left corner. So circle(0, 0); draws a circle whose center is precisely at the top-left corner of the canvas. Finally, the third and last argument presents the diameter of the circle in pixels.
While learning by trial and error is rewarding when working with simple functions, it can also be time-consuming and frustrating if we cannot figure out what a function does. Without an example, how do we even know circle() requires three arguments? Indeed, it is impossible for us to guess all the functions that p5.js has to offer, and that’s why there is a p5.js reference page. We can find this reference page within the web editor menu bar by going to Help > Reference.
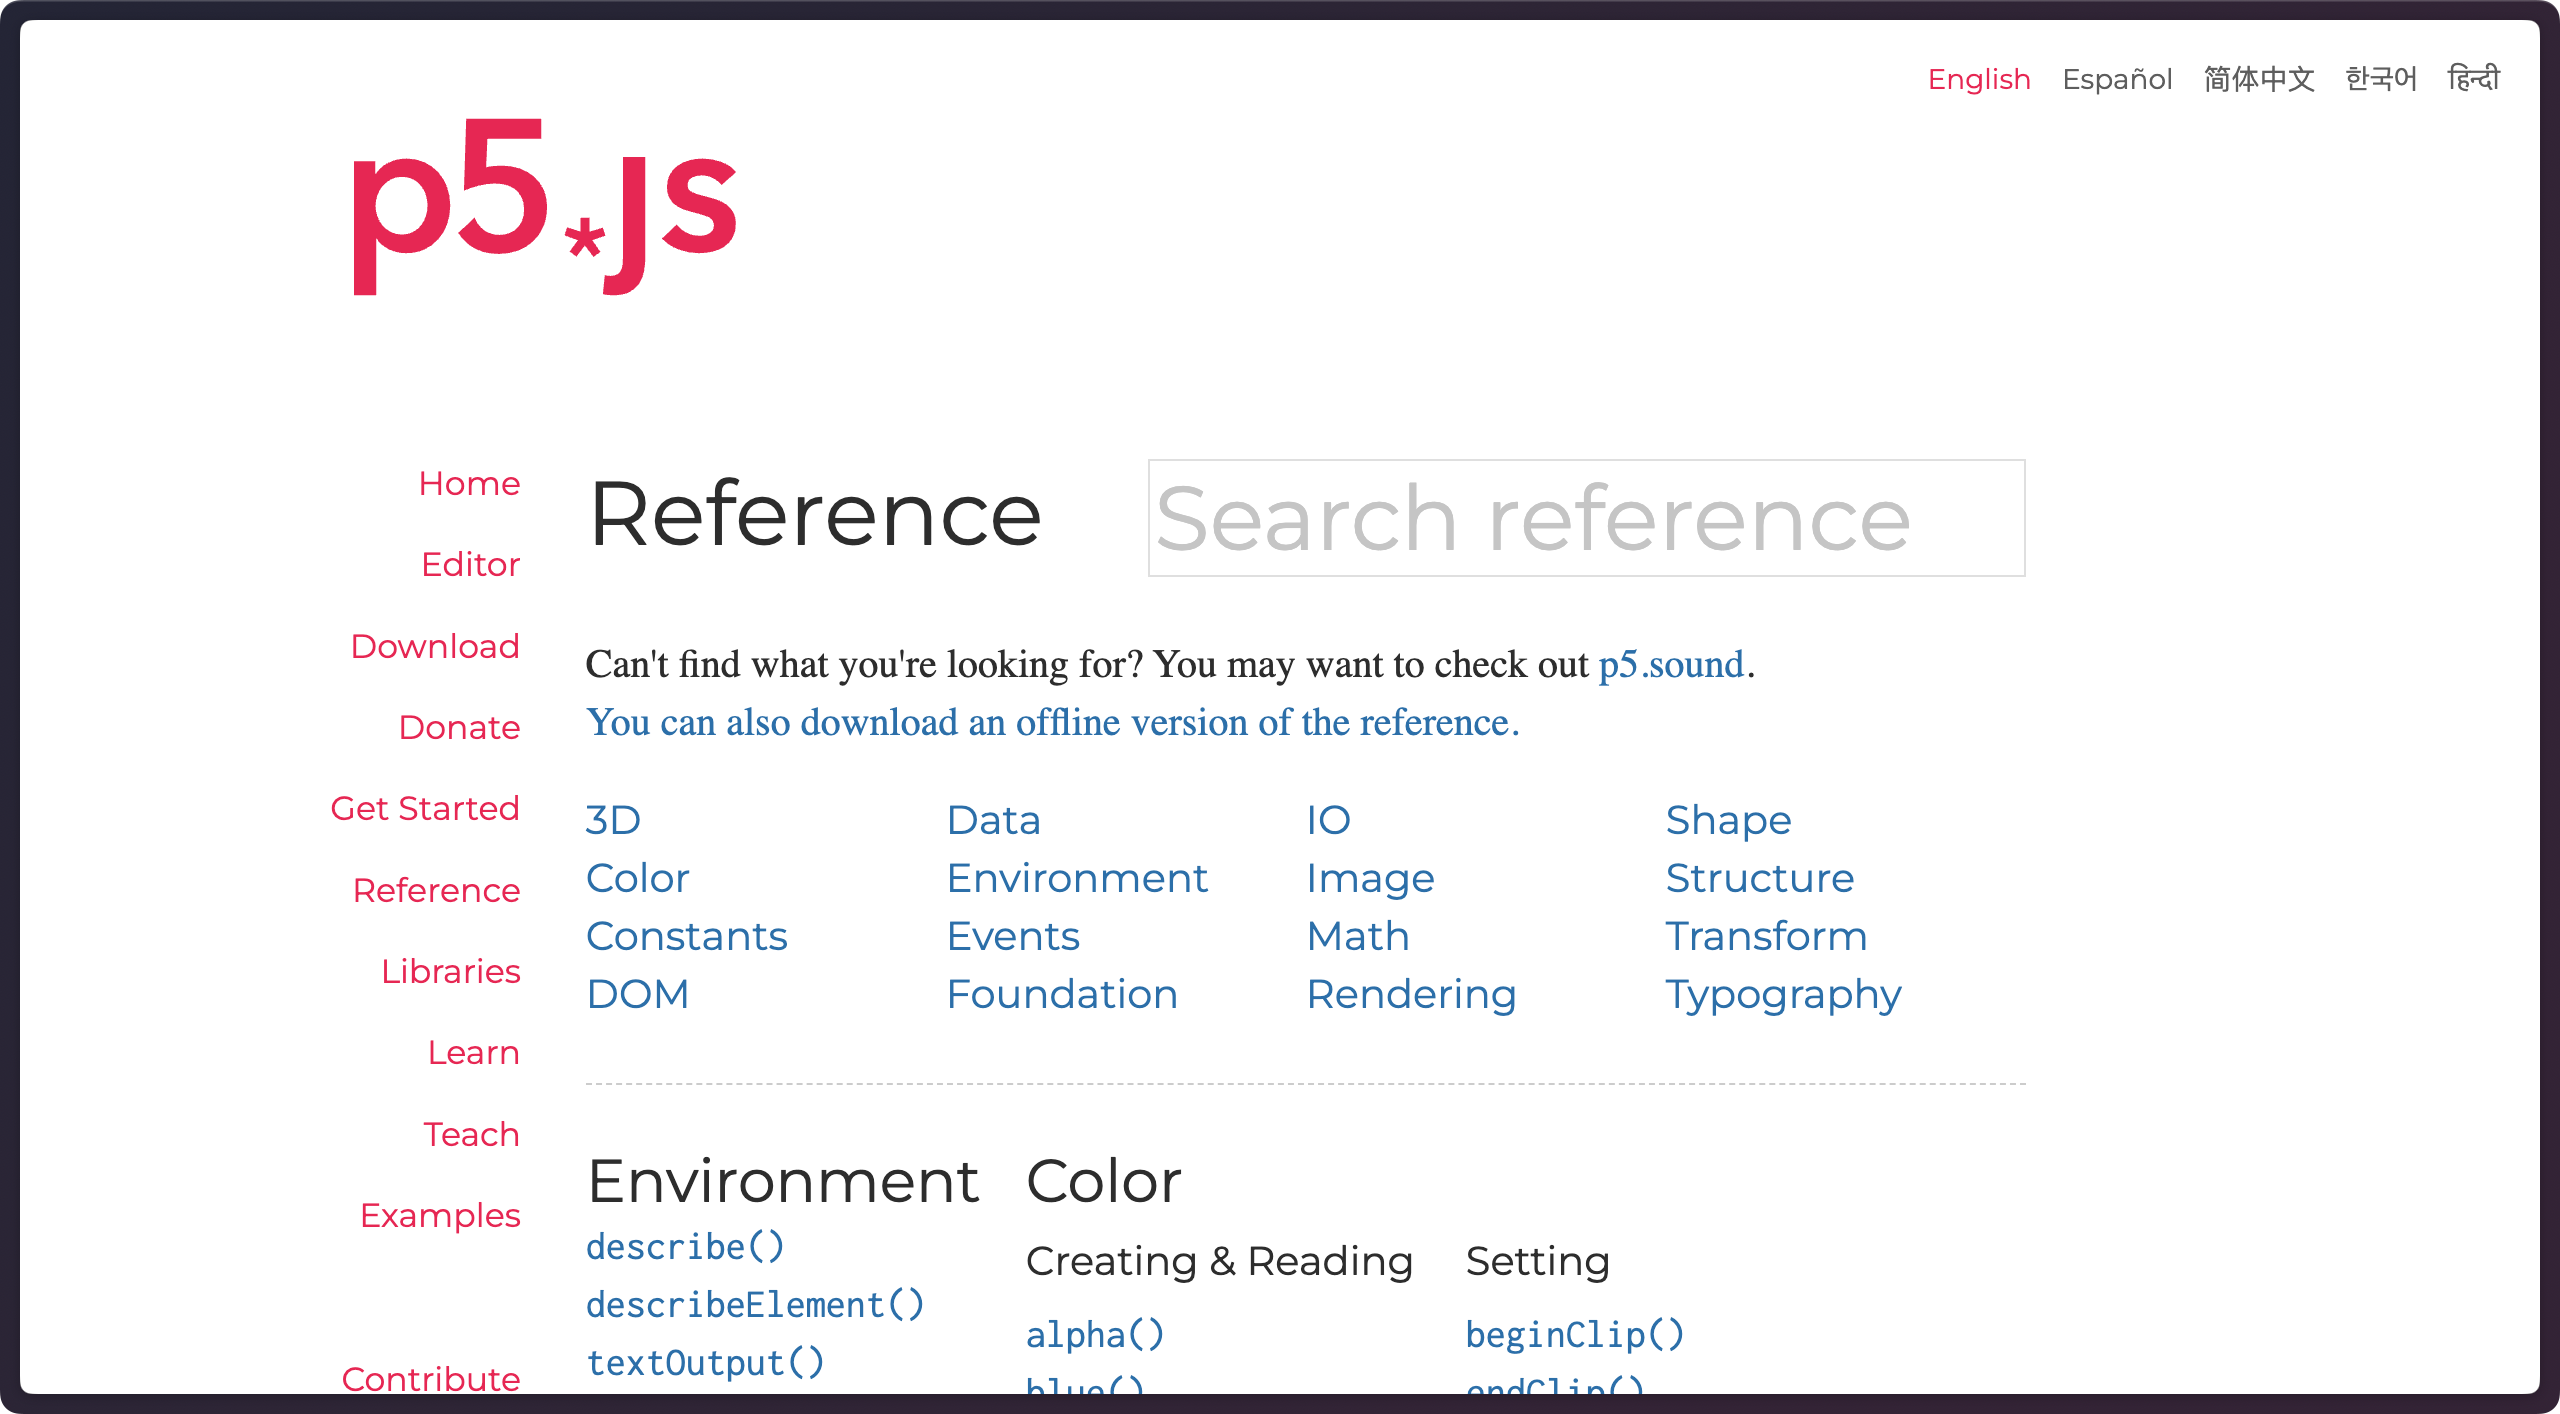
Voilà! The answers to all our questions!
Now, if we want to draw a different shape, we can simply look it up in the reference. For instance, we can click Shape and we’ll jump to the section where all functions related to shapes are listed.
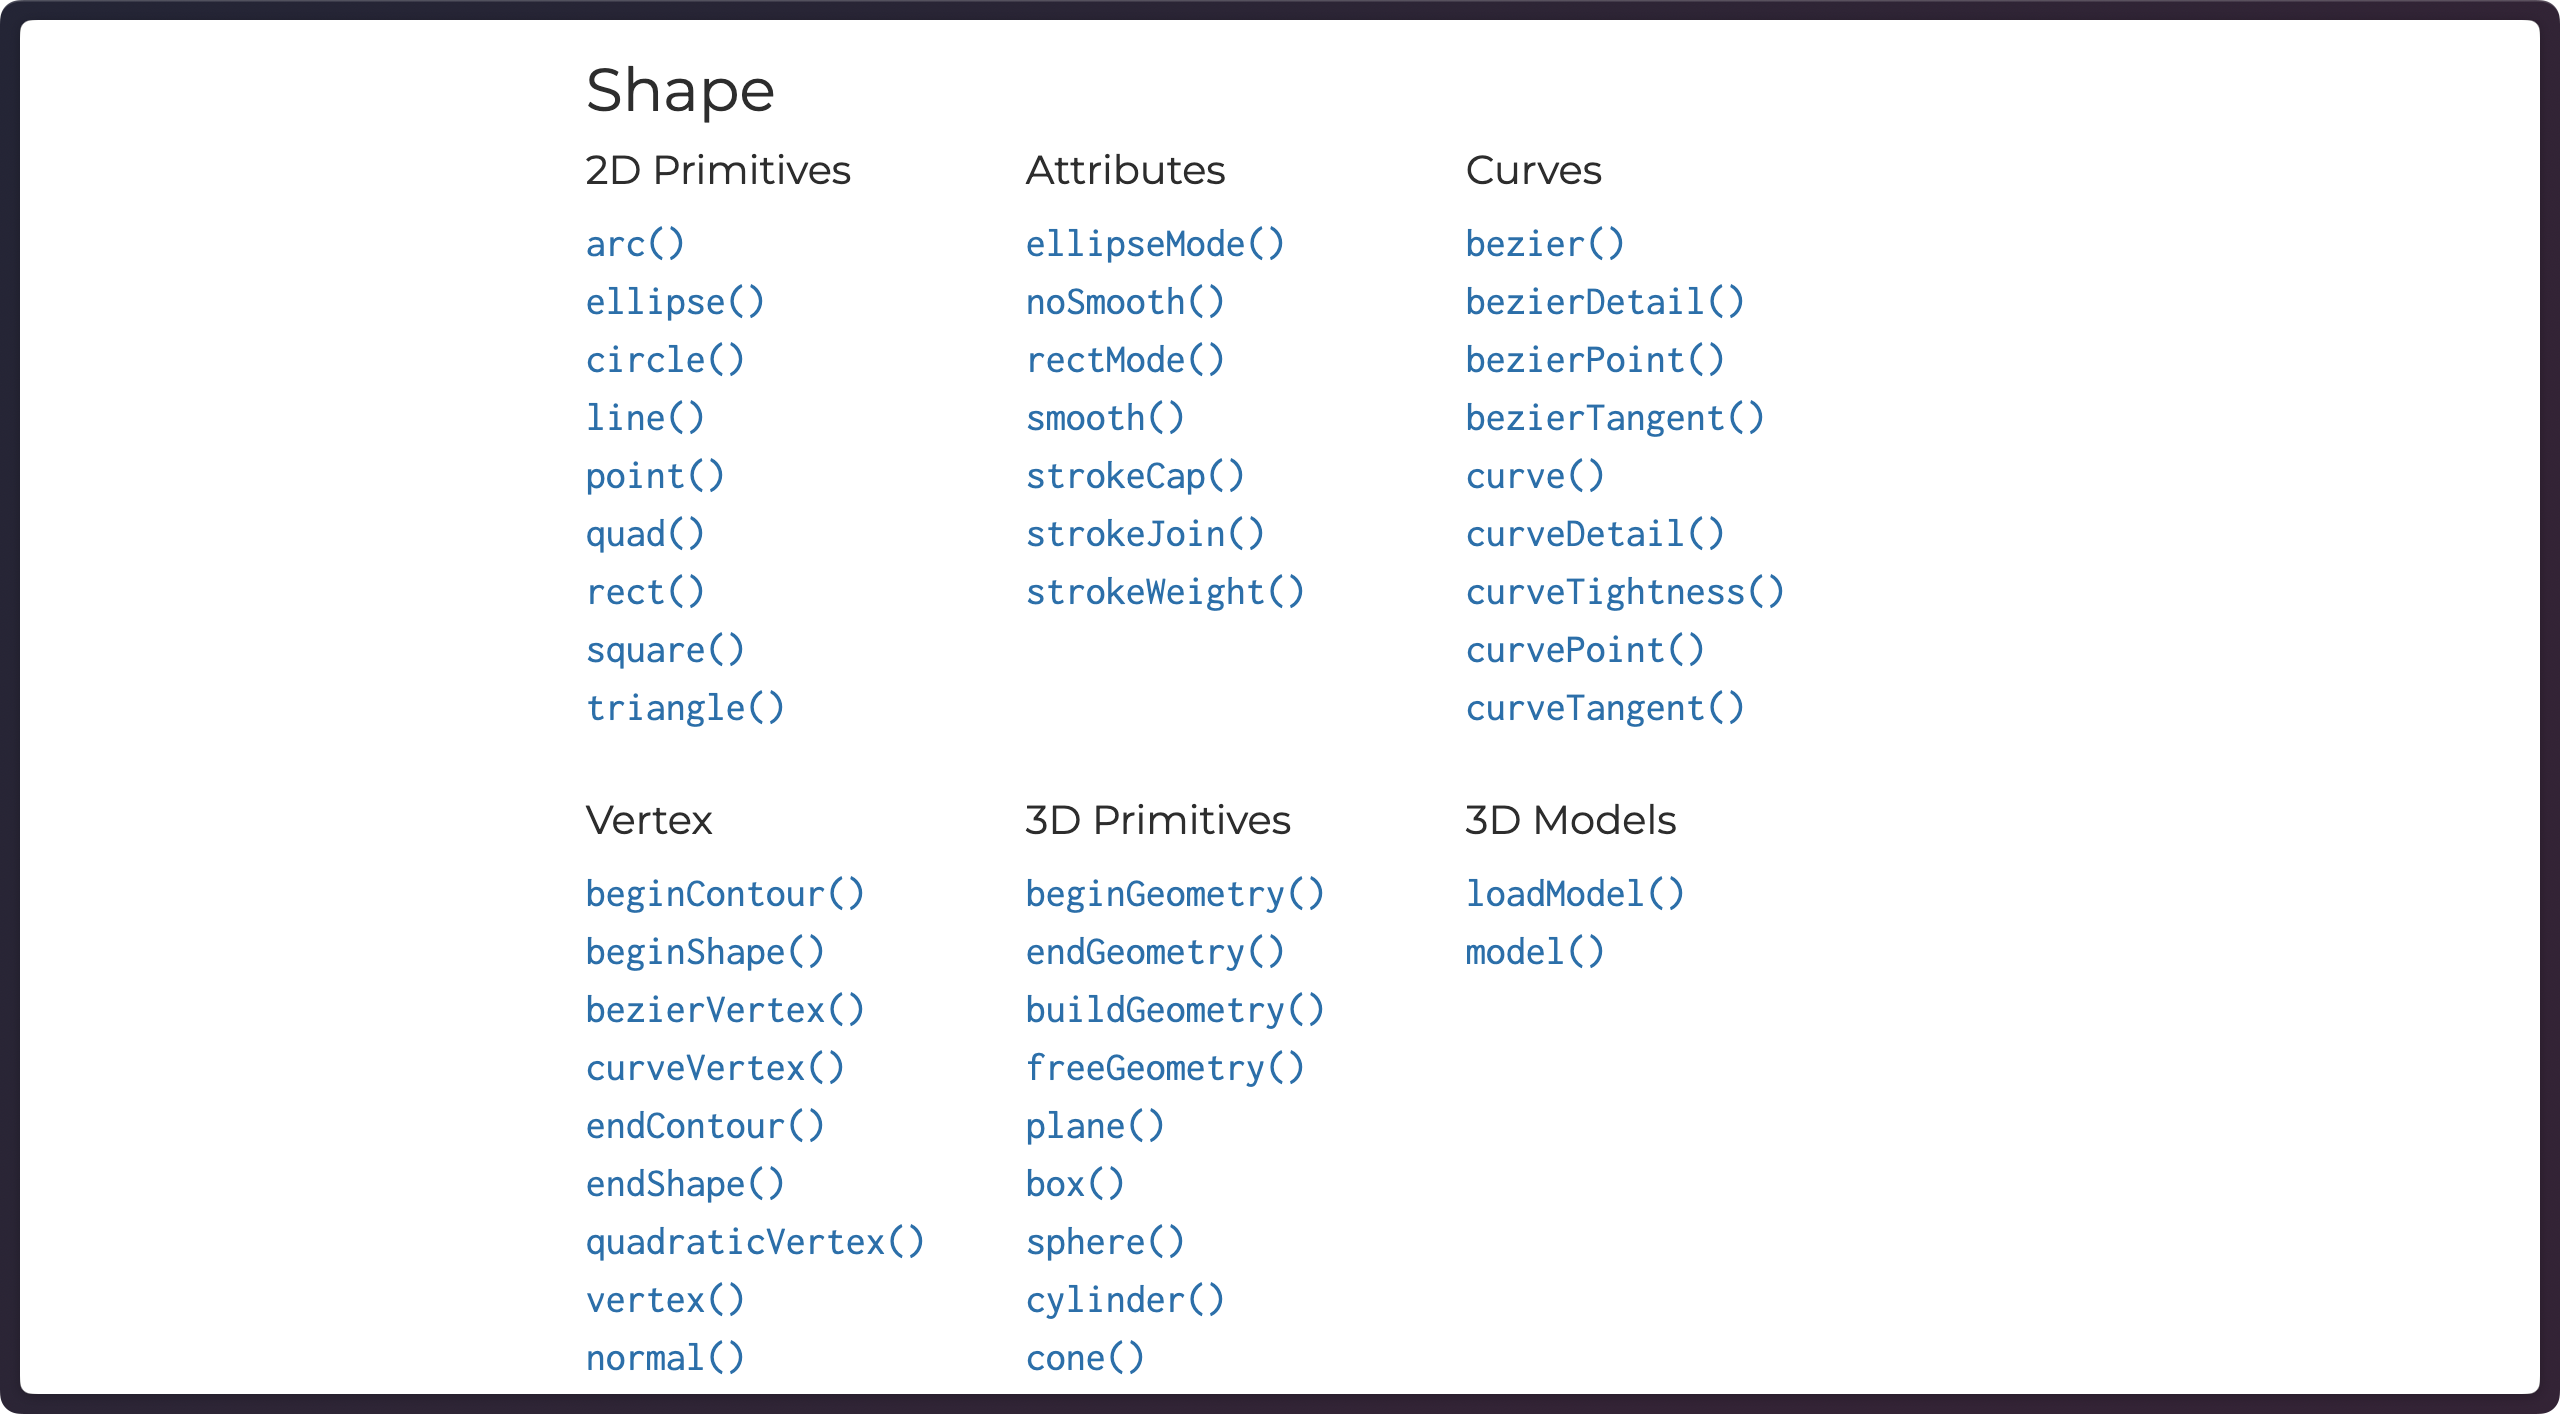
Exercise
With the help of the reference, learn how to use line(), rect() and triangle(). Use all these shapes to draw your favorite animal or plant. Feel free to explore other shapes as well.
0.2.2 Variables
We’ve just drawn a circle with numbers as its arguments. What if we want to give each number a name? We can do something like this:
function setup() {
  createCanvas(400, 400);
}

function draw() {
  background(220);
  const x = 200;
  const y = 200;
  const d = 100;
  circle(x, y, d);
}
These names that we declared, x, y, and d, are called variables. We can use three different keywords to declare a variable, namely, const, let, and var:
-
constis used to declare a variable that should not be changed. -
letis used to declare a variable that might be changed. -
varis the older way to declare a variable, we won’t be using it in our tutorials, but you may encounter that in other people’s code.
Generally speaking, use const whenever you can unless you need to change the variable later.
These four lines of code does exactly the same thing as circle(200, 200, 100);, so why bother turning one line of code into multiple lines? Both methods are correct, but in my opinion, using variables improve readability. It might seem trivial with one circle, but once we start drawing more than one circle, these variables can help keep our code much more organized. Here is an example:
const x = 200;
const y = 200;
const d1 = 200;
const d2 = 100;
const d3 = 50;
circle(x, y, d1);
circle(x, y, d2);
circle(x, y, d3);
0.2.3 Animation
Drawing a circle at the center of the canvas really isn’t the most exciting thing. What if I tell you that we can make it move? Moving the circle essentially means changing the value of x and/or y. Remember how I mentioned we need to use the keyword let to declare variables that change values? Let’s do that.
let x = 200;
let y = 200;
const d = 100;

function setup() {
  createCanvas(400, 400);
}

function draw() {
  background(220);
  circle(x, y, d);

  x = x + 1;
  y = y + 1;
}
This sketch will draw a circle at the center of the canvas and then the circle will slowly move towards the bottom-right corner of the canvas.
This is the first time we’ve seen any code outside setup() or draw(). This area is called global scope and variables in the global scope is called global variables. They are global, because we will be able to use these variables anywhere after they are declared, which includes within setup() and draw(). If we move the variable declarations to setup(), we will see an error message in our console ReferenceError: Can't find variable: x. That is because variables declared within a function is only accessible within that function.
Similar to setup(), code in the global scope runs only once. So the values that we assign to the variables are only the initial values for them, which are modifed later in draw() with x = x + 1; and y = y + 1;.
Whenever there is a single equal sign = and some operation like x + 1 or y + 1 on its right side, the operation is first performed and its result is then assigned to the left side. In this case, 1 is added to x or y and then reassigned to x or y. So x or y is essentially incremented by 1. Since the value of x is initally 200, after running x = x + 1 once, the value of x is now 201. Why does it keep incrementing without a stop? Do you still remember that draw() runs continuously without a stop? In fact, by default, draw() runs roughly 60 times per second as long as our computer is able to handle it. This speed is called frame rate and its unit is FPS (Frame Per Second). We can change the frame rate of our sketch using the frameRate() function. Since a const frame rate is usually preferred, we can put this function in setup(). Our setup() function will look like this:
setup() {
  createCanvas(400, 400);
  frameRate(10);
}
Try changing the frame rate and see it affects the circle’s movement. The slower the frame rate, the slower the movement. In addition, the smaller the frame rate, the choppier the movement becomes (the motion becomes less smooth). This is why we usually keep our frame rate at a high value such as 60. For reference, movies are usually played at 24 FPS in theater, and most common computer monitors are 60 Hz (i.e. the maximum frame rate they can display is 60 FPS).
Back to the draw() function, the frame rate controls the number of times the function runs per second. With the frame rate being 60, draw() function runs 60 times per second, which means x = x + 1 is executed 60 times within a second. After the first second of the sketch running, the circle moves from 200, 200 to 260, 260.
Similarly, to move the circle to the opposite direction, we can change + to -. In fact, since these two operations, x = x + 1 and x = x - 1, are so commonly used in programming, there are shorthands for them, namely, x++ and x-- respectively.
Additionally, if we would like to increase or decrease a variable by a value different from 1, there is a different shorthand. x = x + 2 is the same as x += 2, and y = y - 10 is the same as y -= 10. As we increase or decrease x and/or y by a larger number, the circle moves faster.
0.2.4 Interaction
There are lots of potentials in algorithmic animation, but what truly makes coding shine is that our sketches can be interactive.
0.2.4.1 Mouse Position
In p5.js, there are some very helpful built-in variables that we can use. In the sketch below, instead of assigning a number to x and y, we are using mouseX and mouseY, which conveniently give us the exact coordinate of the mouse position.
const d = 300;

function setup() {
  createCanvas(400, 400);
}

function draw() {
  background(220);
  const x = mouseX;
  const y = mouseY;
  circle(x, y, d);
}
Now, wherever we move our mouse to, the circle moves to that exact spot.
0.2.4.2 Moving to Draw
Let’s make a very minor change—moving background(220); from draw() to setup().
const d = 300;

function setup() {
  createCanvas(400, 400);
  background(220);
}

function draw() {
  const x = mouseX;
  const y = mouseY;
  circle(x, y, d);
}
Did you see the difference? The mouse now leaves a trail of circles. How? background() is in setup(), that means we are only drawing the background once. As draw() runs 60 frames/second, we are drawing 60 circles on the canvas every second, and new circles are drawn on top of old circles. Cool, huh?
You may also notice that we are using const for x and y here, but mouseX and mouseY are clearly different for every frame. Didn’t I just say the value of a const variable should not change? In fact, if you declare a variable within a function, namely in the function scope, the variable only lives within that function. Moreover, these variables are destroyed and redeclared each time the function runs. Therefore, as long as const variables stay the same within each frame, which they do, we are safe here.
0.2.4.3 Pressing to Draw
Are you annoyed that circles are drawn whenever you move your mouse? Since we’ve gotten so far, we might as well make it act like a painting app. (How exciting! We are building our own MS Paint here. ![]() )
)
Let’s describe our objective—we want to draw circles if mouse is pressed. Guess what, the code for it doesn’t look that different.
const d = 30;

function setup() {
  createCanvas(400, 400);
  background(220);
}

function draw() {
  const x = mouseX;
  const y = mouseY;
  if (mouseIsPressed) {
    circle(x, y, d);
  }
}
We are seeing something new here. In draw(), we just added an if statement, which is followed by a pair of parentheses () and a pair of curly braces {}. The parentheses () are used to enclose the condition under which the code within the curly braces {} should run. In our case, the condition is mouseIsPressed. This can also be written as mouseIsPressed === true. Three equal signs === indicates it is a test, rather than an assignment, which uses one equal sign =. Note that true is not a variable, it is a special keyword indicating a data type called boolean, which is either true or false. mouseIsPressed, on the other hand, is a variable and it is one of those special variables that p5.js provide us. The value of mouseIsPressed depends on whether or not any of our mouse keys is pressed. When any mouse key is pressed, mouseIsPressed evaluates to true, and if none of the mouse keys is pressed, mouseIsPressed evaluates to false.
In short, if (mouseIsPressed) evalutes to true, the code inside {} will run, otherwise, nothing happens.
If we want something to happen when (mouseIsPressed) evalutes to false, we can add an else statement immediately afterwards. For instance, we can use the code below to draw a large circle (with a diameter of 300 pixels) when mouse is pressed, and a small circle (with a diameter of 30 pixels) when mouse is not pressed.
const D = 300;
const d = 30;

function setup() {
  createCanvas(400, 400);
  background(220);
}

function draw() {
  const x = mouseX;
  const y = mouseY;
  if (mouseIsPressed) {
    circle(x, y, D);
  } else {
    circle(x, y, d);
  }
}
if and else are what make our sketches “smart”, as our sketches can now do different things based on a given condition.
0.2.5 Randomness
We’ve learned how to draw circles at specific positions based on different rules. Now let’s draw them at random locations.
const d = 30;

function setup() {
  createCanvas(400, 400);
  background(220);
}

function draw() {
  const x = random(0, 400);
  const y = random(0, 400);

  circle(x, y, d);
}
By default, random() outputs a random number from 0 (inclusive) to 1 (exlusive). We can also manually provide a minimum value (inclusive) as well as a maximum value (exlusive), as in the case of random(0, 400), which outputs a number from 0 to 400 (the number could potentially be 0, hence inclusive, but could never be 400, hence exlusive). Since it is very common for the minimum value to be 0, we can omit that and only specify the maximum value. random(400) does exactly the same thing.
This sketch will uniformly draw new circles at a random position anywhere within our canvas. It works pretty well until we change our canvas size to a larger size, such as createCanvas(600, 600). Now the circles are only drawn within the top-left 400-by-400-pixel section of our sketch. Surely, we can quite easily fix that by updating the maximum value for our random() functions, but it wouldn’t be so easy if we have hundreds of random() functions. How do we solve that? p5.js provides yet another pair of “special” variables for us width and height, which are exactly the same value of the width and height of the canvas, respectively.
Let’s rewrite our code:
const d = 30;

function setup() {
  createCanvas(400, 400);
  background(220);
}

function draw() {
  const x = random(width);
  const y = random(height);

  circle(x, y, d);
}
Now, no matter what size the canvas is, the random() function automatically adapts to it so that the random circles will evenly cover the entire canvas.
0.2.6 Colors
0.2.6.1 Colorful Shapes
We’ve come a long way with just black, white, and gray. Let’s make things colorful now.
One of the easy ways to specify color is to use color names. For example, background("red") will draw a red background. In JavaScript, we use quotation marks "" or '' to enclose text, whose data type is string (as in a string or sequence of characters). The quotation marks help us distinguish a string "red" from a variable red.
Before you get stressed out about memorizing all the English color names, let me show you a few other ways. In p5.js, you can also use multiple numbers to represent a color. By default, if you are using three numbers, such as background(255, 0, 0), these numbers are the RGB (red, green, and blue, respetively) values of the color on a scale from 0 to 255. So background(255, 0, 0) also draws a red background.
In addition to RGB, you can use the colorMode() function to switch to one of the two other color modes— HSB (hue, satuaration, brightness) or HSL (hue, saturation, lightness). We will be mostly using RGB, but feel free to read more about other color modes on the colorMode() reference page.
Here are a few functions that will be helpful here
-
fill()sets the color that fills shapes -
noFill()disables fill color -
stroke()sets the color of the outlines of shapes. -
noStroke()disables stroke color -
strokeWeight()sets the thickness of the stroke
Note that these functions can be used “on the go” to switch between different color settings in draw() and they only affect the the shapes that come after them.
Here is an example of multiple shapes in different colors.
function setup() {
  createCanvas(400, 400);
}

function draw() {
  background(220);
  fill("pink");
  stroke("brown");
  strokeWeight(2);
  circle(150, 150, 50);
  circle(250, 150, 50);
  fill(255, 0, 0);
  noStroke();
  circle(200, 200, 30);
  noFill();
  stroke(0);
  strokeWeight(5)
  rectMode(CENTER);
  rect(200, 250, 100, 30);
}
0.2.6.2 Random Colors
One advantage of using numbers instead of names for color is the ability to control colors algorithmically. Let’s use random() to choose random values for our colors.
const d = 30;

function setup() {
  createCanvas(400, 400);
  background(220);
}

function draw() {
  const x = random(width);
  const y = random(height);
  const r = random(255);
  const g = random(255);
  const b = random(255);
  fill(r, g, b)
  circle(x, y, d);
}
This sketch draws circles in competely random colors. If we want to use only bright colors, we can specify the minimum values for our random() functions. Instead of random(255) which gives us a number between 0 to 255, we can use random(150, 255) to ensure all three values are larger than 150 hence brighter.
0.3 Summary
This wraps up the fundamentals of p5.js. Now we have the necessary programming knowledge to start our journey of learning machine learning with ml5.js.